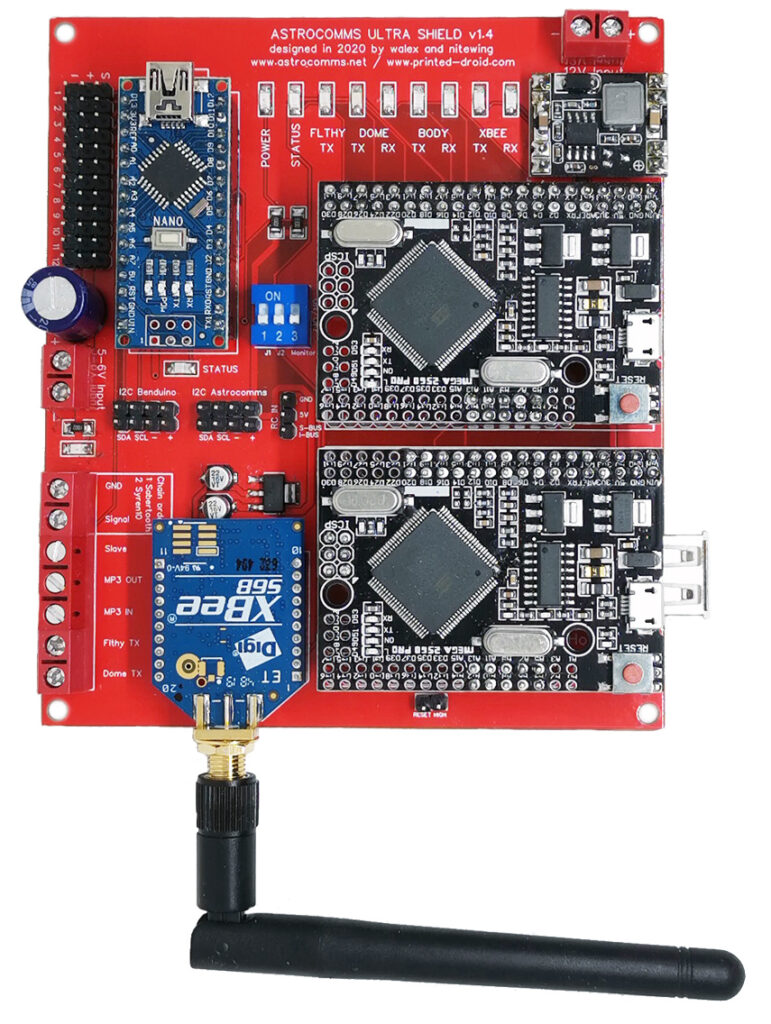
There are 3 different versions of the Astrocomms the most recent version is the Astrocomms Ultra.
Available at shop.printed-droid.com
Astrocomms Mega Shield (outdated!)
The Astrocomms Mega Shield, developed by walex and nitewing, allows simultaneous connection and use of the controller and the smartphone app for controlling the Benduino/Marcduino system. Before that you had to decide if you want to use the app or the controller – or use a switch to toggle between them.
And there are more features. Connect 3 Benduinos/Marcduinos (even 4 should be possible) and controll 26 servos: 10x Panels, 6 Holo & 10x Body servos.
No Marcduino firmware changes are needed.
The Astrocomms Mega Shield is sitting on an Arduino Mega 2560 with special firmware and is working as an interpreter betweeen the Body Arduino (running Shadow MD), Bendiunos/Marcduinos and the Flthy Holoboard.
The Xbee is not longer directly connected to the Benduino/Marcduino Master. It’s plugged into the Astrocomms Mega Shield. Also the Flthy Holoboard is not longer connected to the Benduino/Marcduino, it receives it’s commands from the Astrocomms.
Everything is working in real time with no noticeable latency!
And there are much more features coming 🙂
Original code rights on the Marcduino V2 firmware belong to CuriousMarc & Neil Hutchinson and Marcduino V3 firmware rights belong to Neil Hutchison.

Features:
- simultaneous connection and use of the Controller and the Smartphone app
- No need for switching between Controller and App
- Connection of 3 Marcduinos (4 in developement) and the Flthy Holoboard
- Full control of 10 + 6 Dome Servos (10 Panels & Holos)
- Full control of 10 Body servos
- No need for digging in the code to make the Flthy System work properly
- Easy way to create own Holo sequences with all Servos and Lights without digging in the Firmware
- Custom commands can be added to the smartphone app easily
- Real time control of all components
- Status and trafficmonitoring via LED
Astrocomms Mega Shield Pro
The Astrocomms Mega Shield, developed by walex & nitewing, has the same basic features like the normal Astrocomms Mega Shield.
But it has some additional features:
- the Mega 2560 is the Pro Version and is directly on the PCB (still possible to use the explorer) – so the board is more compact
- the Xbee will be attached direct to the PCB (no need for the regulated explorer board)
- additional I2C ports and command structure for further modules and enhancements

Astrocomms Ultra Shield
The Astrocomms Ultra Shield, developed by walex & nitewing, has the same basic features like the Astrocomms Mega Shield Pro but is even more powerful.
Ultra Shield additional features:
- the newest revision (2021/11) has native support for ESP32 instead of Xbee
- the Mega 2560 running the Shadow MD firmware is also on the pcb
- the Ultra Shield has the USB Host on board
- there’s an additional Benduino on board controlling the body servos (via marcduino firmware or own Benduino Body Master Firmware)

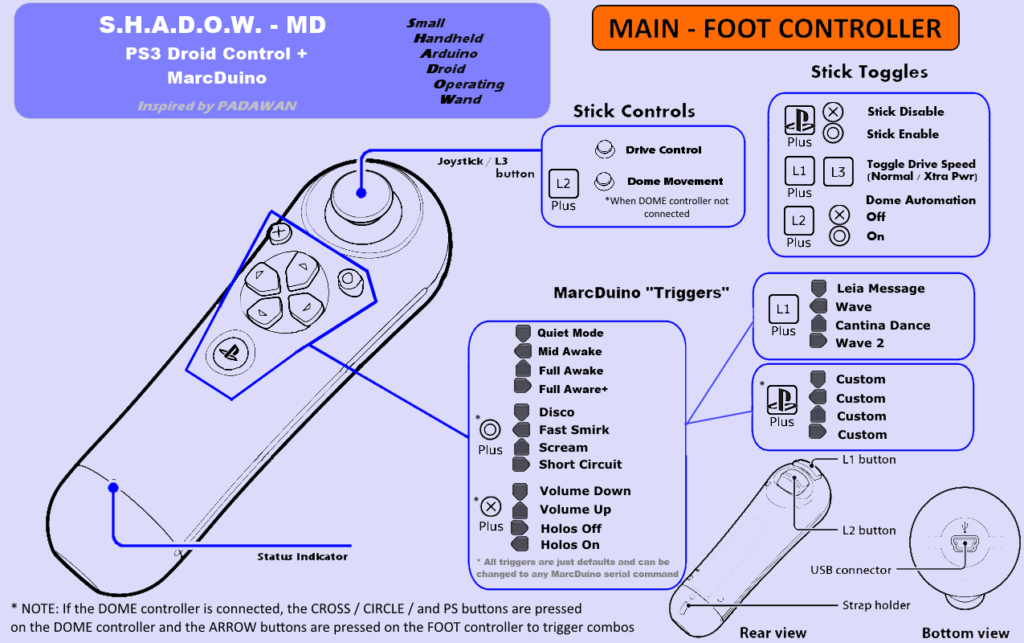
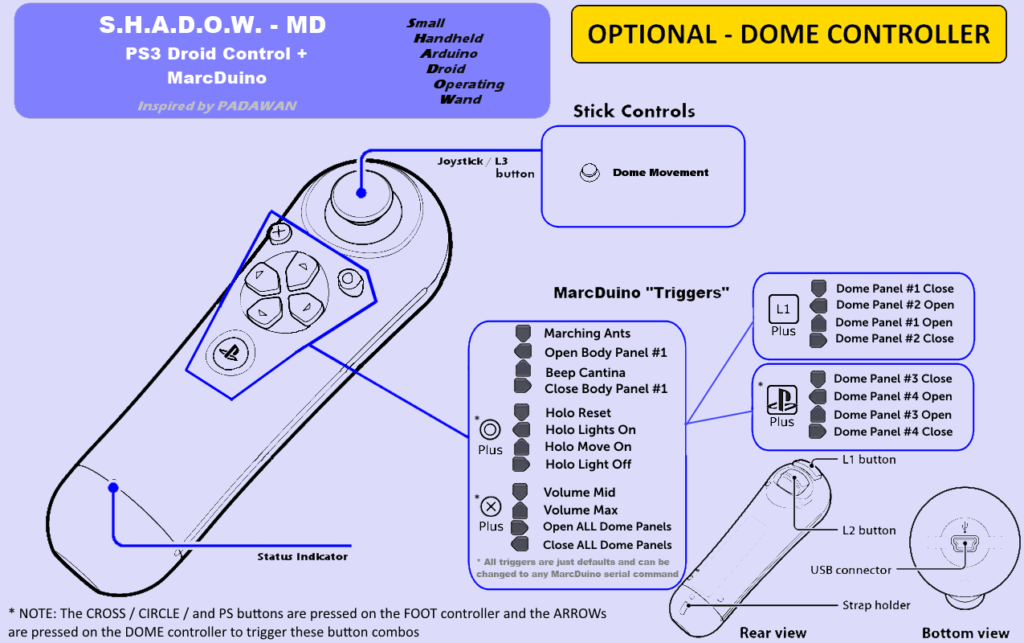
Controller Layout:


Pairing a PS3 Controller to Astrocomms
Benduino Bodymaster:
The Astrocomms Ultra has its own Arduino Nano onboard that can control the body panels.
Usually it has the Benduino body firmware on it, but can also be operated with Marcduino Master Firmware.
In the serial monitor : is used as prefix, but via the app it has to be ; !
Thus, the body panels are addressed and not the dome panels!
For example:
;OP00 opens all body panels and ;CL00 closes all body panels.
Please download the instructions below from the attachments for more information. There it is described how to change the direction, speed and opening angle of the individual servos. This is in the appendices below.
Firmware & flashing:
Astrocomms:
the original Firmware from Walex and the new Firmware from Nobser are in the attachements.
Its highly recommended to use the 2024 Version V1.10
Please find attached both the original Firmware by Walex and the new Firmware by Nobser. We strongly advise using the 2024 Version V1.10.
Flash the firmware with “Xloader” (see attachements).
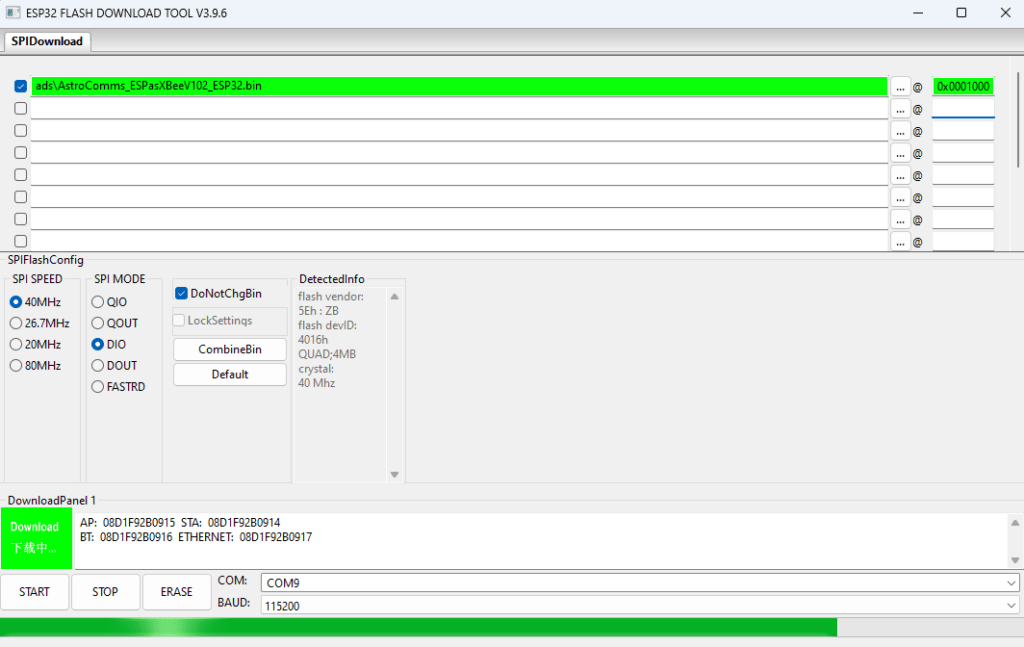
ESP:
For the Esp use the ESPasXBEE Firmware (depending if you’re using an ESP8266 or an ESP32), also in the attachements.
ESP8266:
Start Adress is 0x0

ESP32:
Start Adress is 0x00010000

Default credentials:
WiFi: R2TOUCH
Password: R2TOUCH123
IP: 192.168.1.10
Port 9750
Commands:
/HELP               show usage
/WIFIAPSSID <AP SSID>       set Access Point SSID
/WIFIAPPASSWORD <AP Password>   set Access Point Password
/WIFISSID <WiFi SSID>       set Station SSID
/WIFIPASSWORD <WiFi Password>   set Station Password
/NOWLMK <LMK>           set ESP-MOW LMK (Text)
/NOWPMK <PMK>           set ESP-NOW PMK (Text)
/NOWCHANNEL <Channel>       set ESP-NOW Channel (Number)
/NOWSETPEER <xx:xx:xx:xx:xx:xx> set ESP-NOW communication peer MAC address
/NOWCLEARPEERS          clear all ESP-NOW communication peers
/NOWLISTPEERS           list all ESP-NOW communication peers
/RESTART            restart module
/FACTORY            set factory settings and restart module
/ACTIVATE [CAN|NOW|WIFI|ENC]    acticate CAN-/NOW-/WIFI-Functionality or ESP-NOW encryption
/DEACTIVATE [CAN|NOW|WIFI|ENC]  deacticate CAN-/NOW-/WIFI-Functionality or ESP-NOW encryption
If you have issues with the driver use the CH340 driver installer from the attachements (CH341SER.rar).
To utilize the ESP, flash the ESPasXBEE Firmware included in the attachments, based on whether you are using an ESP8266 or an ESP32.
Flash with ESP-Flasher from here: https://www.espressif.com/en/support/download/other-tools
