Original Github: https://github.com/RealNobser/BetterDuinoFirmwareV4
Important Disclaimer
BetterDuinoFirmwareV4 has nothing to do with the original firmware made by Marc nor with the spinoff made by Neil! So if you have any questions about BetterDuino Firmware V4 don’t ask any of them!
If you find any issues, please use the github “Issues” mechanism. When you are an experienced software developer please feel free to submit pull requests. This is a living repository and I appreciate any community input!
Please do not contact astromech.net or open up a discussion in the astromech.net forum. astromech.net is not in charge with BetterDuinoFirmwareV4. You will not get any support or help regarding BetterDuino. On the other side, if you have questions about the original firmware for MarcDuino boards, then you are fine in the astromech forum.
If there are still questions not anserwed here, feel free to visit Michael Baddeleys fantastic Printed Droid community here: https://www.facebook.com/groups/printeddroid/ or https://www.facebook.com/groups/MrBaddeley .
You will be treated in a fair and polite way and we will find a solution or answer to your questions!
Update: Now there also is a BetterDuino support thread on Astromech.net: https://astromech.net/forums/showthread.php?44309-MarcDuino-Replacement-Firmware
Nevertheless: Read and understand, how the boards work, why there is a master and a slave board, how the boards are connected ->
https://www.curiousmarc.com/r2-d2/marcduino-system
https://astromech.net/forums/showthread.php?28414-Support-Thread-for-MarcDuino-v1-5-s
As soon as you are familiar with MarcDuino, come back here and proceed!
Why a Replacement Firmware for MarcDuino boards?
The last update to the original firmware was in 2018. Neil’s last update was a minor change in mid-2022. His V3 software has about 80% of the original source in common, adding some features for the latest MarcDuino boards (servo controllers and EXT/AUX pin controllers). He also added the nice feature of saving settings to EEPROM at runtime. But the code also has some glitches and bugs and is based on outdated Arduino libraries. I started 2023 after the whole Arduino framework and community has made really great progress in the last 5 years.
The BetterDuino Firmware V4 code has completely been rewritten from scratch. I took Neils idea of the EEPROM storage a step further, so nearly any setting is stored there. Including per-servo position settings. I also added the new panel animation of Tim Hebel who is also using a modified MarcDuino V3 firmware (https://github.com/Eebel/SHADOW_MD_EEBEL).
What is the MarcDuino system?
(from https://www.curiousmarc.com/r2-d2/marcduino-system):
“The MarcDuino system controls the animatronics of an R2 (dome panels, light and sound). It currently controls 10 dome panels, an “MP3 Trigger” sound board, dome “Teeces” lights and holoprojectors light and movements, and I2C gizmos you can add-in yourself. It has lots of pre-programmed effects making all these act together.
The system is centered around the MarcDuino boards which sit in the R2. There are two kinds, the Master and the Slave board, which are very similar to each other.” – CuriousMarc
What is BetterDuino Firmware V4?
The BetterDuinoFirmwareV4 software is a firmware replacement for the original MarcDuino V1.5Rev3 boards.
Details about the boards can be found here:
https://www.curiousmarc.com/r2-d2/marcduino-system/marcduino-boards/marcduino-v1-5
https://astromech.net/forums/showthread.php?28414-Support-Thread-for-MarcDuino-v1-5-s
The original firmware can be found here:
https://www.curiousmarc.com/r2-d2/marcduino-system/marcduino-software-reference
There also is a spinoff of Marcs firmware also known as MarcDuinoMain V3 and MarcDuinoClient V3:
https://github.com/nhutchison/MarcDuinoMain
https://github.com/nhutchison/MarcDuinoClient
New Features (excerpt)
- Support for MP3 Trigger, DF Mini Player and R2-D2 / Astromech Vocalizer (https://humancyborgrelations.com/)
- Identical firmware for Master and Slave
- Automatic configuration of Master and Slave at first startup
- per servo runtime settings for min/max and open/close positions
- switch to modern OOP software design and use of most recent common Arduino libraries
- fixed a lot of bugs at least of the V3 spinoff
- …
Lets get started:
Revision History
| Date | Rev | Description |
|---|---|---|
| 2024-03-20 | V1.0.8 | Added Dome Lift integration |
| 2024-03-17 | V1.0.7 | removed R2Touch Keepalives, fixed DFMini command sequences |
| 2024-03-09 | V1.0.6 | NeoPixelHolo configuration |
| 2024-03-08 | V1.0.5 | NeoPixelHolo-Integration, Bugfix Servo 12/13 |
| 2024-01-30 | V1.0.4 | First Chopper Integration |
| 2024-01-17 | V1.0.3 | Added free panel positioning to panel sequences 0% = closed / 100% = open |
| 2024-01-15 | V1.0.2 | BugFix-Release |
| 2024-01-13 | V1.0.1 | Classic Master I2C and new I2C slave mode |
| 2023-12-30 | V1.0.0 | First stable public version |
| 2023-12-11 | V0.9.1 RC | Bugfixes from closed beta test group |
| 2023-10-23 | V0.9.0 RC1 | First version for closed beta test group |
Known MISSING functionality compared to the original source (will be released in the future)
- RC-IN support
Supported Boards
| Board | Support | Remark |
|---|---|---|
| MarcDuino V1.5 Rev3 | YES | |
| MarcDuino V1.5 Rev2 | YES | Servo 11 = Master AUX2 Servo 12 = Slave ML Servo 13 = Slave AUX2 Magic Panel = Slave “To Slave” |
| Printed Droid AIO2.0 | YES | Servo 11 = Master A2 Servo 12 = Slave ML Servo 13 = Slave A2 Magic Panel = Slave2 |
| BenDuino boards (https://www.printed-droid.com/kb/benduino-system/) | YES | Servo 11 = Master A2 Servo 12 = Slave ML Servo 13 = Slave A2 Magic Panel = Slave2 |
| MarcDuino V1 | NO | |
| MarcDuino V2 | NO |
Compatibility Matrix
| Master/Salve | 1.8 | 3.x | 4.x |
|---|---|---|---|
| 1.8 | YES | YES | YES |
| 3.x | YES | YES | YES |
| 4.x | YES | YES | YES |
Uploading firmware using *.hex files
- Download the latest hex-Files from the GitHub Repository: https://github.com/RealNobser/BetterDuinoFirmwareV4/releases
- Flash hex file with the following fuse settings (incorrect fuse settings will lead to non functional boards or unintended EEPROM content reset!):
- E fuse: 0xFC
- H fuse: 0xD7
- L fuse: 0xFF
- Recommended: When not using the Arduino IDE take a look at avrdude
- avrdude: https://github.com/MCUdude/avrdude
- GUI for avrdude: https://blog.zakkemble.net/avrdudess-a-gui-for-avrdude/
- some instructions: https://forum.arduino.cc/t/the-simplest-way-to-upload-a-compiled-hex-file-without-the-ide/401996
Development Environment
- Visual Studio Code: https://code.visualstudio.com/download
- PlatformIO Extension: https://platformio.org/install/ide?install=vscode
- Recommended ISP programmers:
Building and uploading firmware using Visual Studio Code
Clone the GitHub repository using Visual Studio Code (Source Control / Clone Repository)


Open local folder
Edit the file “platformio.ini” to match the serial port of your programmer:upload_port = /dev/cu.usbmodem141201 (example)
build the code (PlatformIO / ATmega328P / General / Build)

upload the code (PlatformIO / ATmega328P / General / Upload)

Compiler defines in include/config.h
Normally you do not need to change the defines, but, for experienced users, some instructions:
| Define | Function | Remark | Default |
|---|---|---|---|
| R2D2 | build standard R2D2 MarcDuino compatible firmware | Only choose one, R2D2 or Chopper | on |
| CHOPPER | BETA build new Chopper compatible firmware | Only choose one, R2D2 or Chopper | off |
| DEBUG_MSG | activate additional debug messages on the USB/Serial-Port | program size will exceed, so you can only use that in combination with the DEDICATED_FIRMWARE flag | off |
| INCLUDE_CLASSIC_I2C_SUPPORT | activate support for the classic MarcDuino I2C commands | program size will exceed, so you can only use that in combination with the DEDICATED_FIRMWARE flag | off |
| INCLUDE_I2C_SLAVE | activate support for the ne I2C Slave support | on | |
| DEDICATED_FIRMWARE | when dedicated hex-files for Dome Master, Dome Slave and Body Master are needed, activate this setting with one of the following settings | needed, when programm size in combined mode will be exceeded | off |
| DEDICATED_MASTER | generates hex file with Dome Master code only | Must be set in combination with DEDICATED_FIRMWARE | off |
| DEDICATED_SLAVE | generates hex file with Dome Salve code only | Must be set in combination with DEDICATED_FIRMWARE | off |
| DEDICATED_BODY | generates hex file with Body Master code only | Must be set in combination with DEDICATED_FIRMWARE | off |
…more to follow…
Do not touch any other of the defines.
Connecting Servos R2D2 (common way)
Master:
| Servo | Function | Remark |
|---|---|---|
| Servo 1 | Panel 1 | Lower Panel |
| Servo 2 | Panel 2 | Lower Panel |
| Servo 3 | Panel 3 | Lower Panel |
| Servo 4 | Panel 4 | Lower Panel |
| Servo 5 | Panel 5 | Lower Panel |
| Servo 6 | Panel 6 | Lower Panel |
| Servo 7 | Panel 7 | Upper Panel |
| Servo 8 | Panel 8 | Upper Panel |
| Servo 9 | Panel 9 | Upper Panel |
| Servo 10 | Panel 10 | Upper Panel |
| Servo 11 | unused | |
| AUX | unused |
Client:
| Servo | Function | Remark |
|---|---|---|
| Servo 1 | Front Holo, V-Servo | |
| Servo 2 | Front Holo, H-Servo | |
| Servo 3 | Rear Holo, V-Servo | |
| Servo 4 | Rear Holo, H-Servo | |
| Servo 5 | Top Holo, V-Servo | |
| Servo 6 | Top Holo, H-Servo | |
| Servo 7 | Front Holo Light | |
| Servo 8 | Rear Holo Light | |
| Servo 9 | Top Holo Light | |
| Servo 10=12 | unused | Controlled as Servo 12 via Master |
| Servo 11=13 | unused | Controlled as Servo 13 via Master |
| AUX | unused |
Body:
| Servo | Function | Remark |
|---|---|---|
| Servo 1 | DPL – DataPanel Door | |
| Servo 2 | UtlArmU – Upper Utility Arm | |
| Servo 3 | UtlArmL – Lower Utility Arm | |
| Servo 4 | LBdyDr – Left BreadPan Door | |
| Servo 5 | LArm – Left Arm Raise/Lower | |
| Servo 6 | LArmTool – Left Arm Tool | |
| Servo 7 | ToolRBdyDr – Right BreadPan Door | |
| Servo 8 | RArm – Right Arm Raise/Lower | |
| Servo 9 | RArmTool – Right Arm Tool | |
| Servo 10 | unused | Future Charge Bay Door servo |
| Servo 11 | unused | |
| AUX | unused |
Connecting Servos Chopper
Master:
| Servo | Function | Remark |
|---|---|---|
| Servo 1 | Left Dome Door | |
| Servo 2 | Left Dome Arm | |
| Servo 3 | Left Dome Gripper | |
| Servo 4 | Left Dome Arm Turn | Tim Hebel Mod |
| Servo 5 | Right Dome Door | |
| Servo 6 | Right Dome Arm | |
| Servo 7 | Right Dome Gripper | |
| Servo 8 | Right Dome Arm Turn | Tim Hebel Mod |
| Servo 9 | Periscope Lift | |
| Servo 10 | Periscope Turn | |
| Servo 11 | unused | Periscope LED? |
| AUX | unused |
MarcDuino/BetterDuino Commands
Unsupported original MarcDuino features:
· no Panel/Servo RC_IN support
· some configuration commands are not supported / necessary due to cleaned command processing / storage
Commands
Routing
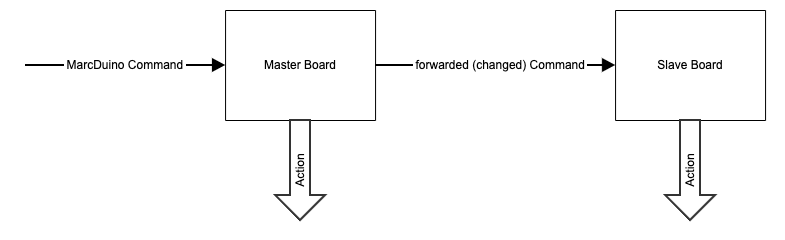
All commands are sent to the master board. The slave board is always connected to the master board. Slave boards are not running in stand-alone mode. So the master board decides what to do with the commands. It might process or even omit the command.
Format
Every command must start with one of these special characters (defined in the header file). The start character is recognized in the main loop:
Command processing
| Start Cmd | Function | Master process | Master Interface | Slave process | Slave Interface | Remark |
|---|---|---|---|---|---|---|
| : | Pie panel commands | PROCESSED FORWARDED TO SLAVE P12/P13 | Servos Serial_Slave | PROCESSED | Servos | Slave is only responsible for panel 12/13 |
| * | Holo Projector (HP) commands | NOT PROCESSED FORWARDED TO SLAVE | Serial_Slave | PROCESSED | Servos | |
| @ | Display commands | NOT PROCESSED FORWARDED TO SLAVE | Serial_Slave | PROCESSED | Serial_Teeces | |
| $ | Sound commands | PROCESSED NOT FORWARDED | Serial_MP3 | NOT AVAILABLE | – | |
| ! (Master) | Alt1 alternate sound commands, passed to Serial_MP3 after stripping start command character | PROCESSED NOT FORWARDED | Serial_MP3 | NOT AVAILABLE | – | |
| ! (Slave) | Alt1 alternate display commands, passed to Serial_Teeces after stripping start command character | – | – | PROCESSED | Serial_Teeces | In normal use the Master MarcDuino catches these, so we don’t see them |
| % | Alt2 alternate Holo Projector board commands, passed to Serial_Slave without stripping start command character | NOT PROCESSED FORWARDED TO SLAVE | Serial_Slave | PROCESSED | Serial_Magic | |
| # | Setup Commands | PROCESSED FORWARDED TO SLAVE | EEPROM Serial_Slave | PROCESSED | EEPROM | #MDxx command (MarcDuino mode) will not be forwarded to slave |
| & | I2C-Commands | PROCESSED FORWARDED TO SLAVE | I2C Serial_Slave | PROCESSED | I2C |
Panel Commands
They must follow the syntax “:CCxx\r” where CC=command , xx= two digit decimal number, \r is carriage return.
| Command | Function | Master | Slave | Remark |
|---|---|---|---|---|
| :SExx | launches sequences, see below | YES | YES | |
| :OPxx | open panel number xx=01-13. If xx=00, opens all panels (12/13 Slave only) | YES | YES | |
| :OP14 | open top panels | YES | NO | tbd |
| :OP15 | open bottom panels | YES | NO | tbd |
| :CLxx | close panel number xx=01-13, removes from RC if it was, stops servo. If xx=00, all panels, slow close. | YES | YES | |
| :LKxx | lock panel number xx=01-13, lock current position to avoid problems with DomeLift. If xx=00, locks all panels (12/13 Slave only) | YES | YES | |
| :ULxx | unlock panel number xx=01-13, unlocks panel, normal mode. If xx=00, unlocks all panels (12/13 Slave only) | YES | YES | |
| :RCxx | places panel xx=01-13 under RC input control. If xx=00, all panels placed on RC. | YES | NO | |
| :STxx | buzz kill/soft hold: removes panel from RC control AND shuts servo off to eliminate buzz. xx=00 all panels off RC servos off. | YES | YES | |
| :HDxx | RC hold: removes from RC, but does not turn servo off, keeps at last position. xx=00 all panels hold. | YES | NO | |
| :MVxxdddd | move panel xx=01-13 to position yyyy. If xx=00, opens all panels (12/13 Slave only), dddd=0000-0180 deg, dddd > 0544 Microseconds | YES | YES |
Sequence Command Details
See sequence_command, panel sequence matrices defined in panel_sequences.h
| Command | Function | Remark |
|---|---|---|
| Full (Move, Sound, Display…) | ||
| :SE00 | Close all panels (full speed), servo off – use as init only. Use CL00 for all soft close. | |
| :SE01 | Scream, with all panels open | |
| :SE02 | Wave, one panel at a time | |
| :SE03 | Fast (Smirk) back and forth wave | |
| :SE04 | Wave 2 (open progressively all panels, then close one by one) | |
| :SE05 | Beep Cantina (with marching ants panel action) | |
| :SE06 | Faint/Short Circuit | |
| :SE07 | Cantina dance (orchestral, rythmic panel dance) | |
| :SE08 | Leia | |
| :SE09 | Disco | |
| :SE10 | Quite Mode reset (panel close, stop holos, stop sounds) | |
| :SE11 | Full Awake Mode reset (panel close, random sound, holo movement, no holo lights) | |
| :SE12 | Top Panels to RC | |
| :SE13 | Mid Awake Mode reset (panel close, random sound, stop holos) | |
| :SE14 | Awake+ Mode reset ((panel close, random sound, holo movement, lights on) | |
| :SE15 | Screams no panels | |
| :SE16 | Panel Wiggle | |
| Body Sequences | ||
| :SE30 | Utility ARM open and close sequence | |
| :SE31 | All Body Panels open and close sequence | |
| :SE32 | All Body Doors open and wiggle close sequence | |
| :SE33 | Body – Use Gripper | |
| :SE34 | Body – Use Interface Tool | |
| :SE35 | Body – Ping Pong Body Doors | |
| Move Panels only | ||
| :SE51 | Scream, with all panels open | |
| :SE52 | Wave, one panel at a time | |
| :SE53 | Fast (Smirk) back and forth wave | |
| :SE54 | Wave 2 (open progressively all panels, then close one by one) | |
| :SE55 | Marching ants | |
| :SE56 | Faint/Short Circuit | |
| :SE57 | Rhythmic panel dance | |
| :SE58 | Panel Wave Bye Bye |
Holo Projector Commands
These commands are only processed by the MarcDuino Slave module
| Command | Function | Remark |
|---|---|---|
| *RDxx | Random Holo movement (xx=01 to 03). xx=00 and >3 all random. | |
| *ONxx | Turns Holo Light on (xx=01 to 03). xx=00 or >3 all lights on | |
| *OFxx | Turns Holo Lights off (xx=01 to 03). xx=00 turns all lights off | |
| *ONxxaaabbbcccddd | Turns RGB Holo Light on (xx=01 to 03). xx=00 or >3 all lights on. aaa – decimal R value (0-255) bbb – decimal G value (0-255) ccc – decimal B value(0-255) ddd – brightness (0-255) | |
| *COxxaaabbbcccddd | Sets color for RGB Holo Light (xx=01 to 03). xx=00 or >3 all lights on. aaa – decimal R value (0-255) bbb – decimal G value (0-255) ccc – decimal B value(0-255) ddd – brightness (0-255) | |
| *RCxx | Holo vertical movement under RC control, horizontal centered (xx=01-03). 00 or >3 all RC | |
| *TExx | Holo movement test (xx=01-03). Goes through a loop of holo movements to assist in adjusting holo servos mechanical setup. 00 or >3 all HPs to test | |
| *STxx | stop/reset Holos random movement, turns lights off, and RC off. 00=all off | |
| *HDxx | hold: stop holo, do not change light level. 00=all stopped | |
| *MOxx | magic panel on. xx=01 to 98, on from 1 to 98 seconds. · xx = 99 is on permanently · xx = 00 is off | |
| *MFxx | magic panel flicker xx=1 to 99 flicker for 1 to 99 seconds. 00= off. | |
| *H1xx *H2xx *H3xx *H0xx | Will turn on-board HP1, 2, 3, and all (HP0xx) for xx seconds. · xx = 99 is on permanently · xx = 00 is off | |
| *Hzxxaaabbbcccddd | See “*H0”-”*H3” aaa – decimal R value (0-255) bbb – decimal G value (0-255) ccc – decimal B value(0-255) ddd – brightness (0-255) | |
| *F1xx *F2xx *F3xx *F0xx | Will flicker on-board HP1, 2, 3, and all (F0xx) for xx seconds. · xx = 99 is on permanently · xx = 00 is off | |
| *Fzxxaaabbbcccddd | See “*F0”-”*F3” aaa – decimal R value (0-255) bbb – decimal G value (0-255) ccc – decimal B value(0-255) ddd – brightness (0-255) | |
| *CHxx | Center Holo Nr xx |
Sound Commands
These commands are only processed by the MarcDuino Master module
| Command | Function | Remark |
|---|---|---|
| $xyy | Play sound command by bank/sound numbers * x=bank number * yy=sound number. If none, next sound is played in. | |
| $xy | Play sound command by bank/sound numbers, short version * x=bank number * y=sound number. If none, next sound is played in. | |
| $C | random from 4 first banks | |
| $O | sound off | |
| $L | Leia message (bank 7 sound 1) | |
| $C | Cantina music (bank 9 sound 5) | |
| $c | Beep cantina (bank 9 sound 1) | |
| $S | Scream (bank 6 sound 1) | |
| $F | Faint/Short Circuit (bank 6 sound 3) | |
| $D | Disco (bank 9 sound 6) | |
| $s | stop sounds | |
| $+ | volume up | |
| $- | volume down | |
| $m | volume mid | |
| $f | volume max | |
| $p | volume min | |
| $W | Star Wars music (bank 9 sound 2) | |
| $w | Beep Star Wars music (bank 9 sound 7) | |
| $M | Imperial March (bank 9 sound 3) | |
| $i | Beep Imperial March (bank 9 sound 8) | |
| $B | Startup Sound |
Special Features
| Command | Function | Remark |
|---|---|---|
| *EOxx TO SLAVE | Pull pin high/low on AUX1. Can be used to trigger a smoke machine as an example. xx is the time in seconds. * 00 – off * 01-98 is the time in seconds (don’t use values >10 for smoke machines!) * 99 on permanently (again don’t use for smoke machines) | will be executed on SLAVE only |
| :EOxx | Pull pin high/low on AUX1. Can be used to trigger a smoke machine as an example. xx is the time in seconds. * 00 – off * 01-98 is the time in seconds (don’t use values >10 for smoke machines!) * 99 on permanently (again don’t use for smoke machines) | will be executed on MASTER only BetterDuino Firmware V4 and greater |
Setup Commands
| Command | Function | Remark |
|---|---|---|
| Servo Controls | ||
| #SOxxdddd | Set Servo xx Degrees/Microseconds for Panel Open, dddd=0000-0180 deg, dddd > 0544 Microseconds | |
| #SCxxdddd | Set Servo xx Degrees/Microseconds for Panel Closed dddd=0000-0180 deg, dddd > 0544 Microseconds | |
| #SPxxddd | Set Servo xx Speed, ddd=0-255 | |
| #SWxx | Swap Panel xx Open<->Close value | Don’t use as the classic “reverse servo” command. Don’t call it at every boot, just use it in adjustment process. |
| Startup Sound Controls | ||
| #SSxxx | Set startup sound · #SS000 : Disable Startup Sound, and remove startup sound delay for fast boot of R2 · #SSxxx : Set Startup Sound in file xxx | |
| #SQxx | Chatty / Silent mode · #SQ00 : Default Chatty Mode · #SQ01 : Silent on startup | |
| #SMxx | Disable Random Sound · #SM00 : Random Sound on · #SM01 : No Random Sound + Volume off · #SM02 : No Random Sound | |
| #SXxx | Set Max Random Pause in seconds – Maximum timespan between two random sounds | |
| #SYxx | Set Min Random Pause in seconds – Minimum timespan between two random sounds | |
| Panel Sequencer Controls | ||
| #STxxx | Setup Delay time between Master and Slave Panel Sequence. Use this if the Slave panels are starting too soon. Values up to 255 are supported. Values are in ms. | maybe depricated |
| System Configuration and Management | ||
| #MDxx | Set MarcDuino Mode · #MD00 : MarcDuino Dome Master · #MD01 : MarcDuino Dome Slave · #MD02 : MarcDuino Body Master MarcDuino will reboot immediately after setup and start up in new mode. | |
| #MPxx | Set MP3-Player Type · #MP00 : SparkFun MP3 Trigger · #MP01 : DFPlayer · #MP02 : Vocalizer | |
| #MSxyy | Set maximum sounds per soundbank. x=1-9 (Soundbank), y=0-25 (max. Sounds) | |
| Holo Projector Configuration | ||
| #HLxy | Set HoloLight x to High Active (y=1) or Low Active (y=0). x=0 → All Holo Lights | Reset board afterwards to take effect |
| #HNxy | Set HoloLight x to NeoPixel (y=1) or Standard-LED (y=0). x=0 → All Holo Lights | Reset board afterwards to take effect |
| #HXxxyy | Configure number of LEDs (yy) for HoloLight xx. | Will only be used, if HoloLight xx is set to NeoPixel, Reset board afterwards to take effect |
| #HOxxdddd | Set Holo HServo Degrees/Microseconds Max, dddd=0000-0180 deg, dddd > 0544 Microseconds | |
| #HCxxdddd | Set Holo HServo Degrees/Microseconds Min, dddd=0000-0180 deg, dddd > 0544 Microseconds | |
| #HPxxddd | Set Holo HServo Speed, ddd=0-255 | |
| #VOxxdddd | Set Holo VServo Degrees/Microseconds Max, dddd=0000-0180 deg, dddd > 0544 Microseconds | |
| #VCxxdddd | Set Holo VServo Degrees/Microseconds Min, dddd=0000-0180 deg, dddd > 0544 Microseconds | |
| #VPxxddd | Set Holo VServo Speed, ddd=0-255 | |
| #DUxx | Dump EEPORM to serial · #DUxx : value at address xx · #DUMP : dump complete EEPROM content | DEACTIVATED AT THE MOMENT, UNDER REVISON |
| #RSET | Restart MarcDuino | |
| #ADxx | Adjustment Mode: When setting up individual Servo settings, servo will positioned immediately · #AD00 : Adjustment Mode Off · #AD01 : Adjustment Mode On |
I2C Commands (Classic, Master-Mode)
Source:
If you send a command following the format:
*&I2Caddress, data, data, data…
an I2C write command will be generated on all the I2C ports in the MarcDuino chain (master and all slaves). The write command will be addressed to the device at I2Caddress and will write all the data bytes provided in order.
Data can be decimal numbers, hex bytes, characters or strings, depending on the prefix appended to the data, as follows.
Decimals need no prefix. Valid range is -128 to 255. For example, to send command 2 (decimal) to an I2C device at address 25:
*&25,2
To send an hex byte, add x as a prefix. To send the hex byte 0xFF to device 25:
&25,xFF
To send a single character, use the ‘ prefix
&25,’c
To send a string, use the ” prefix. Don’t put another ” at the end or it will be transmitted as part of the string…
&25,”Hello World (note: there is no second ” at the end of the string)
And of course you can mix everything:
&25,2,xFF,’c,”Hello World
I2C Commands (New, Slave-Mode)
MarcDuino boards with NewDuino firmware are enabled to receive any serial command also as I2C slave via the I2C interface. So other componetes beside the main control system (ShadowMD etc.) are able to execute commands or start sequences (e.g. dome lift). The protocol is pretty simple, just send an I2C message to one of the following slave addresses with data payload identical to one of the commands described above (don’t forget dto finalise the command with 0x0a = ‘\r’ = Carriage Return.
| I2C-Address (dec/hex) | Type |
|---|---|
| 50/0x32 | MarcDuino Dome Master |
| 51/0x33 | MarcDuino Dome Slave |
| 52/0x34 | MarcDuino Body Master |
I2C addresses can be changed in include/config.h if needed.
Best practice panel adjustment
- Connect a serial interface to the “XBEE/SERIAL IN” port of your board
- Open a serial terminal program and connect via 9600 Baud, 8N1. Activate character echo in your terminal program.
- Use the new “Move Panel” (:MVxxdddd) command to get a feeling, which is the area, the servo moves within.
- If you find a valid position for “open”, store it with the command “Store Open” (#SOxxdddd)
- If you find a valid position for “closed”, store it with the command “Store Closed” (#SCxxdddd)
Example:
- If you think, “:MV010900” moves panel/servo #1 to a valid open position, store the setting with “#SO010900”
- If you think, “:MV011750” moves panel/servo #1 to a valid closed position, store the setting with “#SC011750”
- :MVxxdddd does not store any position, it just moves the servo to the PWM/degree value
Shortcut
- If the default positions are fine but swapped (:OP01 closes the panel and :CL01 opens it), just use “#SW01” to swap the values for open and closed position. The values are automatically stored. Important: That command is not identical to the “Reverse Servo” command. Just use the swap command while calibrating your servos, not at every startup. Otherwise it will always toggle the settings on every startup.
- Repeat all the steps until each servo is calibrated
Connection Dome Lift to MarcDuino boards
Please use BetterDuino firmware V1.0.8 or higher. New I2C slave mode must be activated (standard in BetterDuino, classic I2C Master mode also available in dedicated firmware, see config.h).
- Connect Master InterCom-TX to Dome Lift RX0
- Connect I2C bus from MarcDuino board to Dome Lift Board
- Use modified dome lift firmware (https://github.com/RealNobser/DomeLiftMechanism/tree/main)
- New MarcDuino comand is :LIxx. To be compatible with the R2Touch-App the command mapping is as follows:
| Cmd | Action |
|---|---|
| :LI07 | Bad Motivator |
| :LI08 | Dome Zapper |
| :LI09 | Lightsaber |
| :LI10 | Life Form |
| :LI11 | Periscope |
EEPROM Memory Map
All the settings of the “Setup Commands” are stored in EEPROM. The corresponding Memory Map is described here. Default settings when EEPROM is empty are written in bold letter.
| Address | Type | Content | Default | Description |
|---|---|---|---|---|
| 0x00 | byte | SW-/Config-Version | Version 4.0.x = 40, Version 4.1.x = 41, … | |
| 0x01 | byte | MarcDuinoType | 0 = DomeMaster | 0 = DomeMaster 1 = DomeSlave 2 = BodyMaster |
| 0x02 | byte | DEPRICATED | ||
| 0x03 | byte | Chatty/Silent Mode | 0 = Chatty | 0 = Chatty 1 = Silent |
| 0x04 | byte | MP3-Player-Type | 0 = SparkFun MP3-Trigger | 0 = SparkFun MP3-Trigger 1 = DF-Mini Player 2 = Vocalizer |
| 0x05 | byte | Disable Random Sound | 0 = Random Sound | 0 = Random Sound 1 = No Random Sound + Volume off 2 = No Random Sound |
| 0x06 | byte | Slave Delay | 0 = 0ms delay | Sequence Delay for Slave Sequence Start in ms, 0-255 |
| 0x07 | byte | DEPRICATED (Slave Delay 2. Byte) | ||
| 0x08 | byte | Number of Servos | 13 = 13 Servos (Master + Slave) | |
| 0x09 | byte | Startup Sound Nr | 255 = Sound #255 | Startup Sound Number, 0 = Disable Startup Sound and remove startup sound delay for fast boot of R2 |
| 0x0a | byte | MinRandomPause in seconds | 6 = 6s Pause | Minimal Pause between two Random sounds played |
| 0x0b | byte | MaxRandomPause in seconds | 12 = 12s Pause | Maximal Pause between two Random sounds played |
| 0x0c | byte | DEPRICATED | ||
| 0x0d | byte | Adjustment Mode | 0 = off | Adjustment Mode active (0 = off, 1 = on) |
| 0x11 – 0x19 | bytes | Max Sound Bank 1-9 | Standard SD-Card-Layout: Bank 1: 0x11 = 19 Bank 2: 0x12 = 18 Bank 3: 0x13 = 7 Bank 4: 0x14 = 4 Bank 5: 0x15 = 3 Bank 6: 0x16 = 3 Bank 7: 0x17 = 3 Bank 8: 0x18 = 6 Bank 9: 0x19 = 8 | Bank 1-9, Number of Sounds 1-25 |
| 0x20-0x2f | freed | |||
| 0x30 | freed | |||
| 0x31-0x3d | bytes | Servo1-Servo13 Servo Speed | 255 = max Speed | 0 = Minimum 255 = Maximum |
| 0x40-0x41 | freed | |||
| 0x42-0x5a | words | Servo1-Servo13 Servo Open Position Degrees / PWM | 1000 = 1000 Microseconds Pulse Width | Degrees/Microseconds for Panel Open 0-360=deg, values greater 544 are microseconds |
| 0x60-0x61 | freed | |||
| 0x62-0x7a | words | Servo1-Servo13 Servo Close Position Degrees / PWM | 2000 = 2000 Microseconds Pulse Width | Degrees/Microseconds for Panel Closed 0-360=deg, values greater 544 are microseconds |
| 0x80-0xaf | freed | |||
| 0xb0-0xb3 | freed | |||
| 0xb4-0xbe | words | Servo1 Holo1-Servo-H Min Position Degree / PWM Servo2 Holo1-Servo-V Min Position Degree / PWM Servo3 Holo2-Servo-H Min Position Degree / PWM Servo4 Holo2-Servo-V Min Position Degree / PWM Servo5 Holo3-Servo-H Min Position Degree / PWM Servo6 Holo3-Servo-V Min Position Degree / PWM | 1000 = 1000 Microseconds Pulse Width | Degrees/Microseconds for Holo Min Position 0-360=deg, values greater 544 are microseconds |
| 0xc0-0xc3 | freed | |||
| 0xc4-0xce | words | Servo1 Holo1-Servo-H Max Position Degree / PWM Servo2 Holo1-Servo-V Max Position Degree / PWM Servo3 Holo2-Servo-H Max Position Degree / PWM Servo4 Holo2-Servo-V Max Position Degree / PWM Servo5 Holo3-Servo-H Max Position Degree / PWM Servo6 Holo3-Servo-V Max Position Degree / PWM | 2000 = 2000 Microseconds Pulse Width | Degrees/Microseconds for Holo Max Position, 0-360=deg, values greater 544 are microseconds |
| 0xd1-0xd3 | bytes | Holo 1-3 Light High- or Low-Active | 1 = High-Active | Holo Light High- or Low-Active, 0 = LowActive / 1 = HighActive |
| 0xe0-0xe1 | freed | |||
| 0xe2-0xe7 | Servo1 Holo1-Servo-H Speed (0-255) Servo2 Holo1-Servo-V Speed (0-255) Servo3 Holo2-Servo-H Speed (0-255) Servo4 Holo2-Servo-V Speed (0-255) Servo5 Holo3-Servo-H Speed (0-255) Servo6 Holo4-Servo-V Speed (0-255) | 255 = max Speed | 0 = Minimum 255 = Maximum |