If you are unfamiliar with the AstroCan system, please take a moment to read the following information:
https://www.printed-droid.com/kb/astrocan-control-system/
Dedicated AstroCan Website: https://nextgenastromech.net/
Guide is in the making, please stand by 🙂
All shipped AtsroCan Boards/Bridges have the current Firmware already uploaded!
Preperation:
Download the archive from the article attachements
Inside you’ll find the needed sketches, firmwares and libraries:
Firmwares:
| Name: | Board: | Component: | |
| AstroCAN_MegaShield_DualCan_xxx | Shield/Board | ESP32 | Firmware |
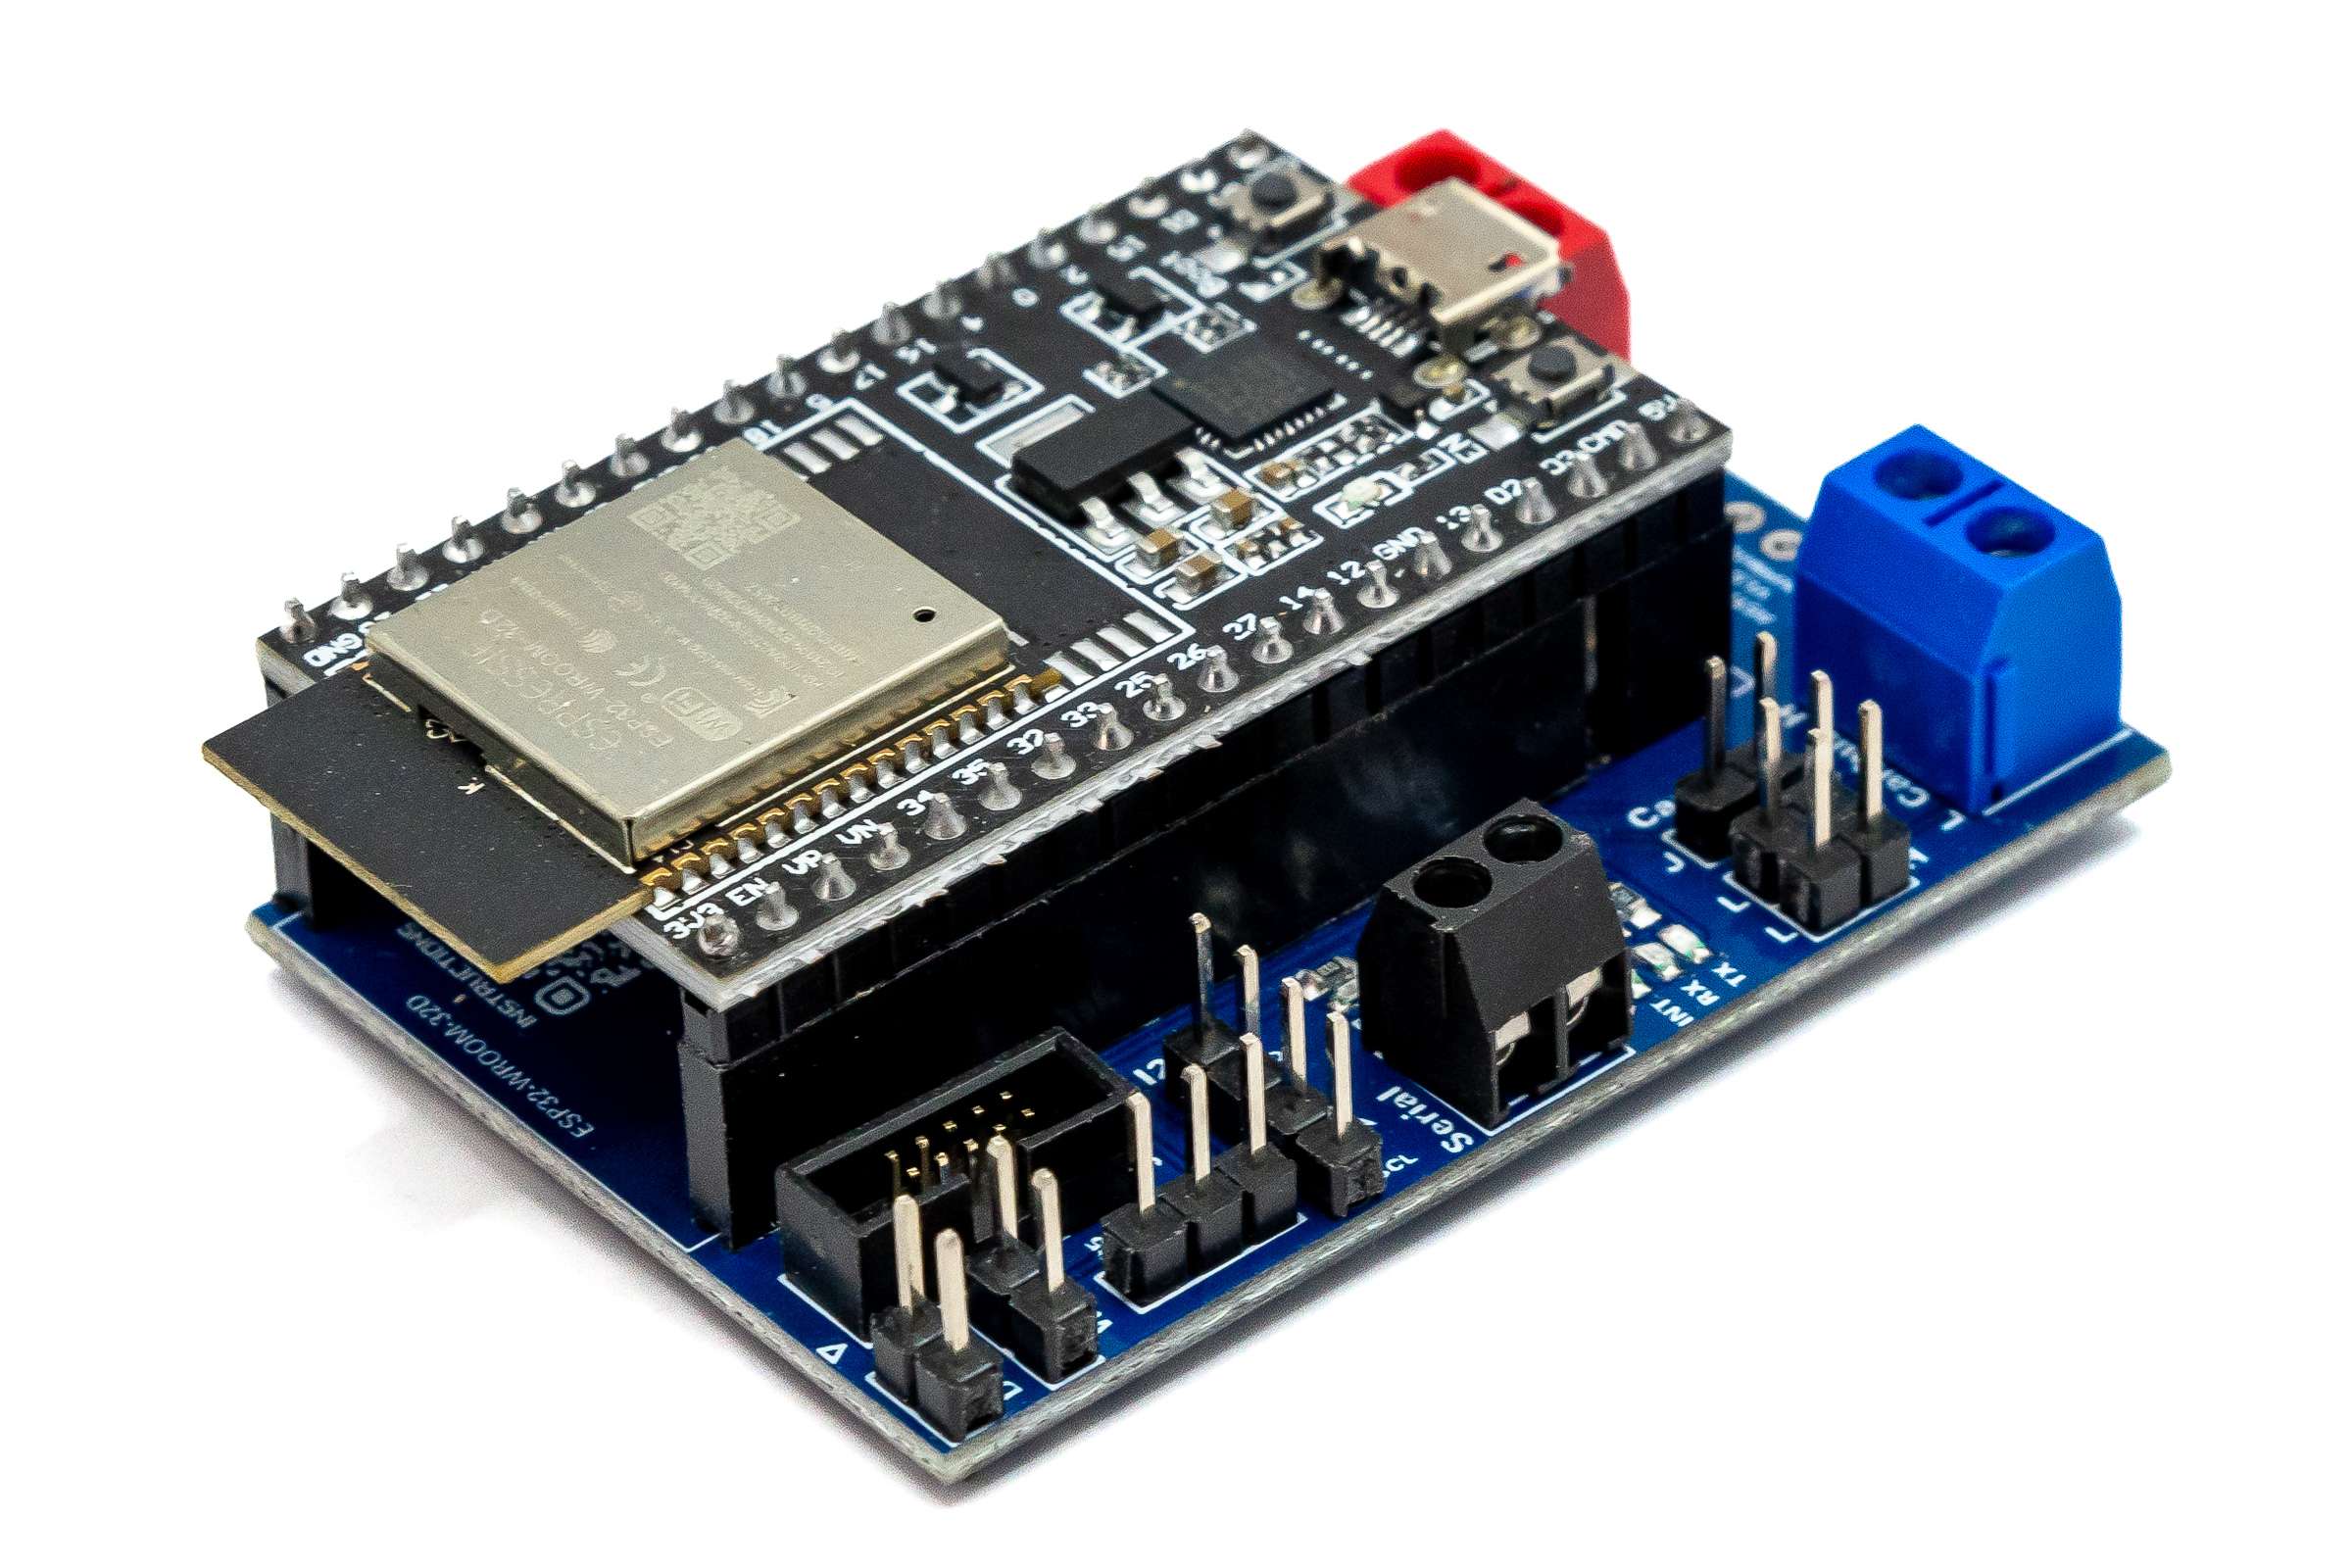
| AstroCAN_Bridge_Firmware_xxx | Bridge | ESP32 | Firmware |
| Betterduino_xxx | Benduino/Marcduino Board | Arduino 328P | Firmware |
Sketches & Libraries:
SHADOW_MD_Sketch is the standard Mega2560 sketch. Please upload it to the Mega with Arduino IDE.
The needed libraries are in the library archive.
Arduino IDE: https://www.arduino.cc/en/software (please use version 1.8.19)
Software:
ESP_flash_download_tool_3.9.6 ist the upload tool for the ESP32. For latest version look here:
https://www.espressif.com/en/support/download/other-tools
Uploading the firmware to the ESP32:
Upload any example sketch via Arduino IDE:
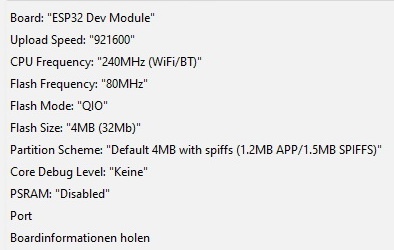
First of all, it’s recommended to upload any example sketch to the ESP32 via Arduino IDE. Please select “the “ESP32 Dev Module”.
Manual for including ESP32 into the Arduino IDE: https://randomnerdtutorials.com/installing-the-esp32-board-in-arduino-ide-windows-instructions/
https://www.youtube.com/watch?v=mBaS3YnqDaU
Upload the Firmware:
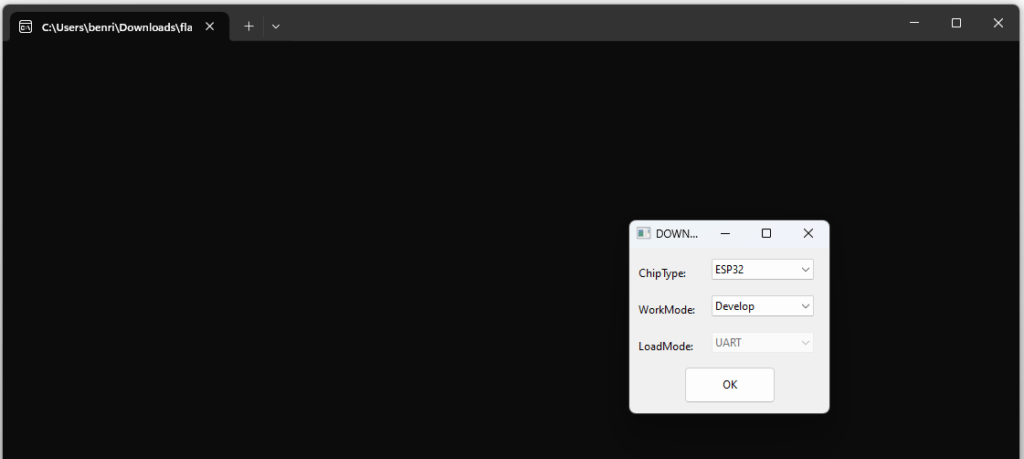
To upload the firmware you need the Flash Download Tool.
Connect the ESP32 via an USB Cable to the computer and run the tool.
Select ESP32 and Develop
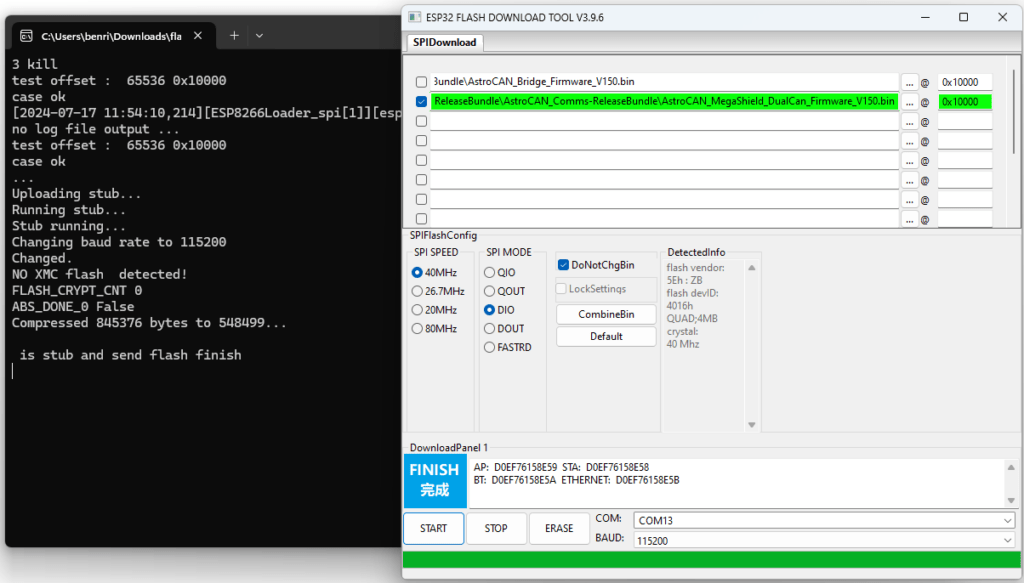
Select the Firmware you want to flash and set the start adress to 0x10000
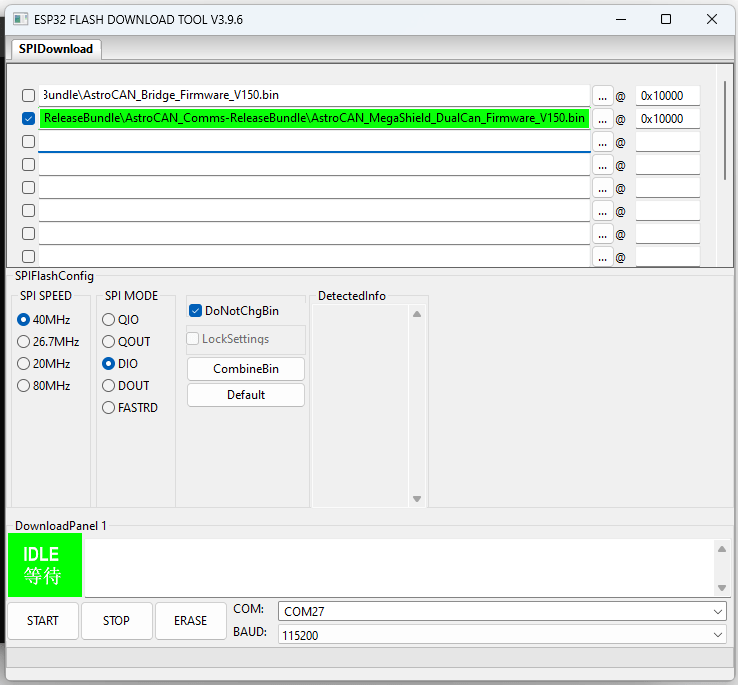
Click start on the bottom left and watch the terminal output. Once it’s sucessfully finished the “IDLE” changes to “Finish”.
When the upload won’t start, try this:
- press and hold the reset button
- press and hold the program/en button
- release the reset button, the ESP will boot in program mode
- release the program button
- upload the sketch
If it still doesn’t work you might have forgotton to upload a testsketch via Arduino IDE before.
Same behaviour could happen there, just try the button method.
Configuring the Firmware
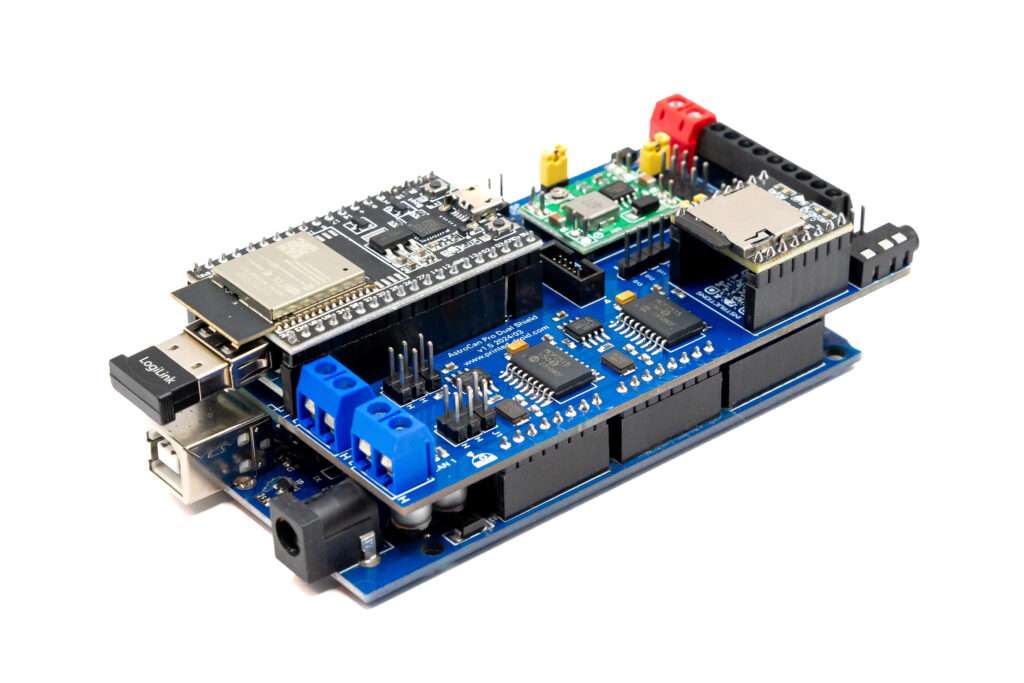
AstroCan Pro Dual Shield Board (& AstroCan Pro Dual Board):
To view the configuration commands, please open the serial monitor in the Arduino IDE and enter “/help”.
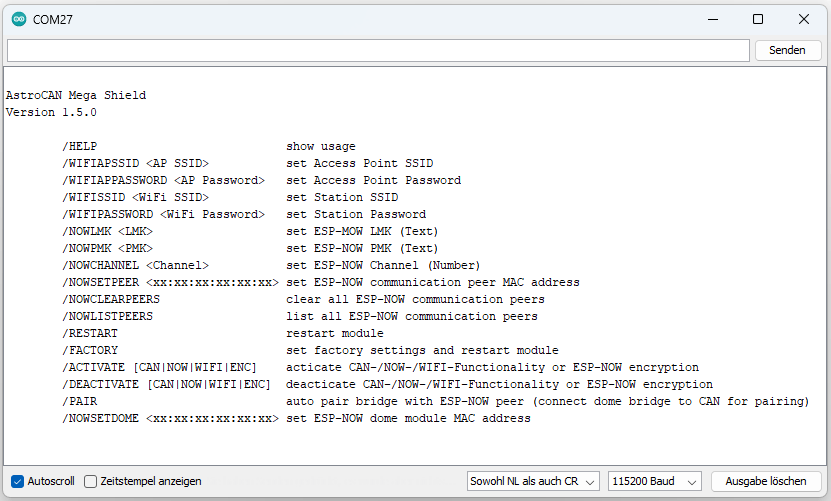
/HELP                            show usage
/WIFIAPSSID <AP SSID>            set Access Point SSID
/WIFIAPPASSWORD <AP Password>    set Access Point Password
/WIFISSID <WiFi SSID>            set Station SSID
/WIFIPASSWORD <WiFi Password>    set Station Password
/NOWLMK <LMK>                    set ESP-MOW LMK (Text)
/NOWPMK <PMK>                    set ESP-NOW PMK (Text)
/NOWCHANNEL <Channel>            set ESP-NOW Channel (Number)
/NOWSETPEER <xx:xx:xx:xx:xx:xx>  set ESP-NOW communication peer MAC address
/NOWCLEARPEERS                   clear all ESP-NOW communication peers
/NOWLISTPEERS                    list all ESP-NOW communication peers
/RESTART                         restart module
/FACTORY                         set factory settings and restart module
/ACTIVATE [CAN|NOW|WIFI|ENC]     acticate CAN-/NOW-/WIFI-Functionality or ESP-NOW encryption
/DEACTIVATE [CAN|NOW|WIFI|ENC]   deacticate CAN-/NOW-/WIFI-Functionality or ESP-NOW encryption
/PAIR                            auto pair bridge with ESP-NOW peer (connect dome bridge to CAN for pairing)
/NOWSETDOME <xx:xx:xx:xx:xx:xx>  set ESP-NOW dome module MAC address
AstroCan Bridge:
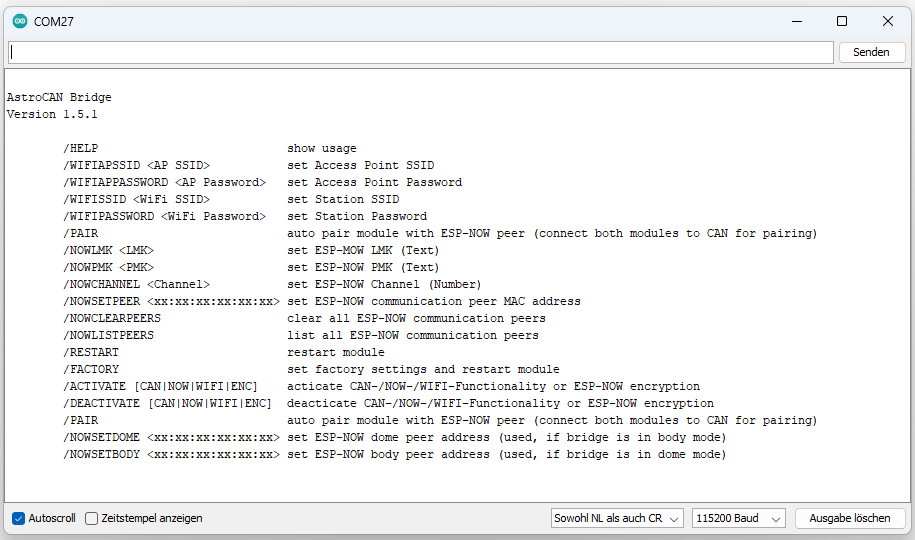
/HELP  				show usage
/WIFIAPSSID <AP SSID> 		set Access Point SSID
/WIFIAPPASSWORD <AP Password> 	set Access Point Password
/WIFISSID <WiFi SSID> 		set Station SSID
/WIFIPASSWORD <WiFi Password> 	set Station Password
/PAIR 				auto pair module with ESP-NOW peer (connect both modules to CAN for pairing)
/NOWLMK <LMK> 			set ESP-MOW LMK (Text)
/NOWPMK <PMK> 			set ESP-NOW PMK (Text)
/NOWCHANNEL <Channel> 		set ESP-NOW Channel (Number)
/NOWSETPEER <xx:xx:xx:xx:xx:xx> set ESP-NOW communication peer MAC address
/NOWCLEARPEERS  		clear all ESP-NOW communication peers
/NOWLISTPEERS  			list all ESP-NOW communication peers
/RESTART  			restart module
/FACTORY  			set factory settings and restart module
/ACTIVATE [CAN|NOW|WIFI|ENC] 	acticate CAN-/NOW-/WIFI-Functionality or ESP-NOW encryption
/DEACTIVATE [CAN|NOW|WIFI|ENC] 	deacticate CAN-/NOW-/WIFI-Functionality or ESP-NOW encryption
/PAIR 				auto pair module with ESP-NOW peer (connect both modules to CAN for pairing)
/NOWSETDOME <xx:xx:xx:xx:xx:xx>	set ESP-NOW dome peer address (used, if bridge is in body mode)
/NOWSETBODY <xx:xx:xx:xx:xx:xx>	set ESP-NOW body peer address (used, if bridge is in dome mode)