Please read here: https://www.printed-droid.com/kb/astrocomms/ about flashing the ESP with a better version designed for the Astrocomms, but also usable for any ShadowMD setup.
The Xbee is often used for controlling droids or exchange informations between arduinos.
But it’s a little expensive and sometimes hard to get.
But it’s possible to replace it with an ESP (tested so far: ESP32, ESP8266 Wemos D1, ESP8266-01)
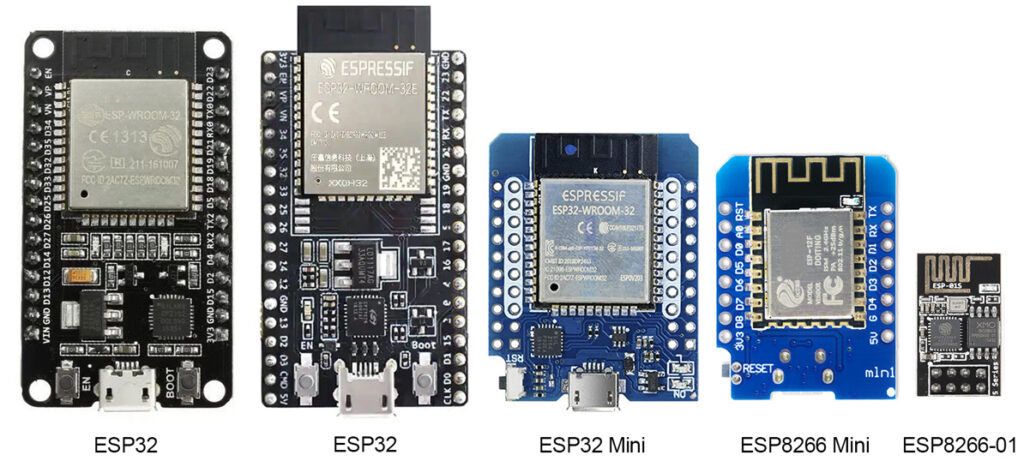
I recommend using an ESP32 (my favorite is the ESP32 D1 Mini – the middle one in the picture) as it offers the most power for an extra $ 1-2. Price is ~ 8USD on Amazon or ~ 4USD on Aliexpress
Or you can use an ESP32 Cam version with external antenna. Please check the pinout twice before you use it!
Programming the ESP with Arduino IDE
Programming the ESP is pretty simple. Only the ESP8266-01 needs an adapter and can be a little tricky.
First of all you have to install the used board within the arduino IDE (ESP32 or ESP8266).
Instructions for ESP32: https://randomnerdtutorials.com/installing-the-esp32-board-in-arduino-ide-windows-instructions/
Instructions for ESP8266: https://randomnerdtutorials.com/how-to-install-esp8266-board-arduino-ide/
After the board has been successfully installed, all you have to do is upload the appropriate sketch.
The SSID and password should be changed in the sketch.
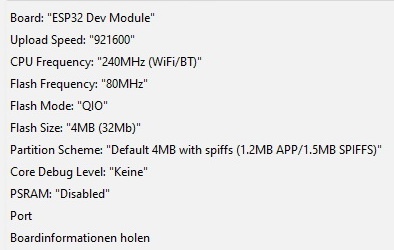
ESP32 Board setting:
Sketch for ESP32 (download at the bottom):
/*
ESP32 XBEE sketch v1.3 2021/10/19
www.printed-droid.com
This sketch makes it possible to use an esp32 instead of the xbee.
Use is at your own risk and without further support.
Please test the range and reliability before use.
More information is available at: https://www.printed-droid.com/kb/esp-as-xbee-replacement/
Change the SSID and password in the sketch!!!
The ESP IP is visible via the Arduino IDE serial monitor (mostly 192.168.4.1)
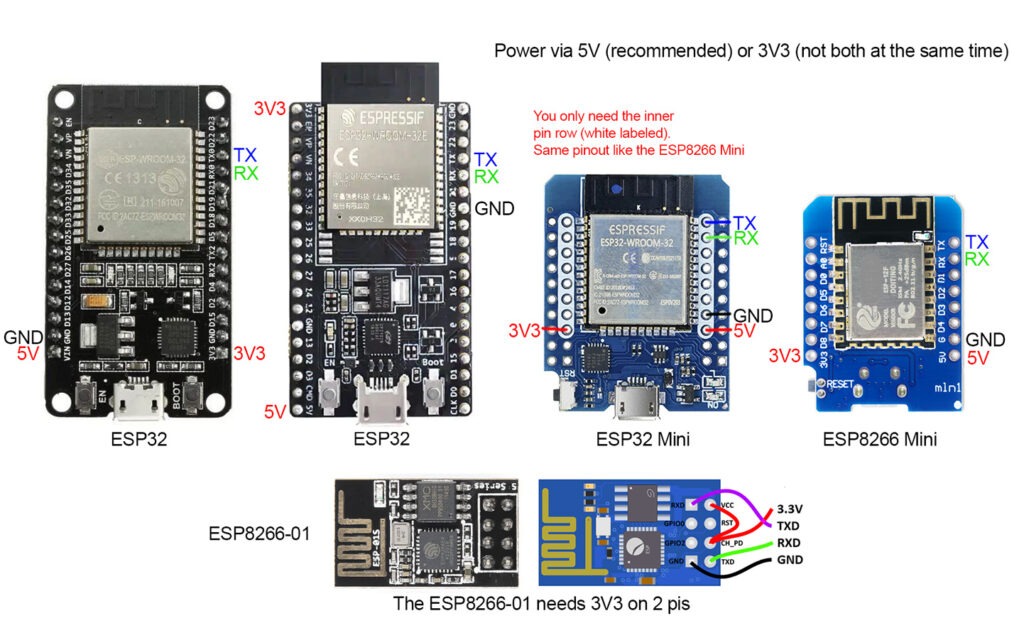
Then the ESP is connected to the Astrocomms, Benduino or Marcduino like the XBEE.
5V
GND
RX to TX
TX to RX
*/
#include <WiFi.h>
const char* ssid = "R2D2 ESP32"; //name of the wifi-network created by the ESP32
const char* pass = "123456789"; //replace with a more secure password!
// Set web server port number to 9750
WiFiServer server(9750);
bool connected = false;
WiFiClient client;
void setup() {
Serial.begin(9600);
Serial.println("Astromech ready");
WiFi.softAP(ssid, pass);
IPAddress IP = WiFi.softAPIP();
Serial.print("AP IP address: ");
Serial.println(IP);
server.begin();
}
void loop() {
// put your main code here, to run repeatedly:
if(!connected) {
client = server.available();
}
if(client.connected()) {
if(!connected) {
Serial.println("TCP connected");
connected = true;
}
while(client.connected()) {
while(client.available() > 0) {
char c = client.read();
Serial.write(c);
}
}
} else {
if(connected) {
Serial.println("TCP disconnected");
connected = false;
}
}
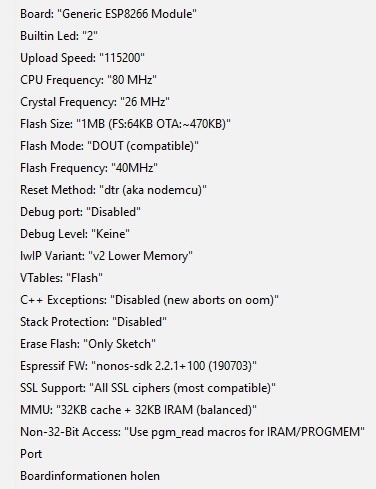
}ESP8266 Board setting:
ESP8266-01 Board setting:
The ESP8266-01 needs the Builtin LED set to 1 instead of 2!
For instructions how to uplad a sketch to the ESP8266-01 look here: https://www.instructables.com/Getting-Started-With-Esp-8266-Esp-01-With-Arduino-/

Sketch for ESP8266 (download at the bottom) :
/*
ESP8266 XBEE sketch v1.3 2021/10/19

www.printed-droid.com

This sketch makes it possible to use an esp8266 instead of the xbee.

Use is at your own risk and without further support.

Please test the range and reliability before use.

More information is available at: https://www.printed-droid.com/kb/esp-as-xbee-replacement/

Change the SSID and password in the sketch!!!
The ESP IP is visible via the Arduino IDE serial monitor (mostly 192.168.4.1)

Then the ESP is connected to the Astrocomms, Benduino or Marcduino like the XBEE.
5V
GND
RX to TX
TX to RX
*/

#include <ESP8266WiFi.h>

const char* ssid = "R2D2 ESP8266"; //name of the wifi-network created by the ESP32
const char* pass = "123456789"; //replace with a more secure password!

// Set web server port number to 9750
WiFiServer server(9750);

bool connected = false;
WiFiClient client;


void setup() {
  Serial.begin(9600);
 Serial.println("Astromech ready");

  WiFi.softAP(ssid, pass);
  IPAddress IP = WiFi.softAPIP();
  Serial.print("AP IP address: ");
  Serial.println(IP);
  server.begin();
}

void loop() {
  // put your main code here, to run repeatedly:
  if(!connected) {
    client = server.available();
  }

  if(client.connected()) {
    if(!connected) {
      Serial.println("TCP connected");
      connected = true;
    }

    while(client.connected()) {
      while(client.available() > 0) {
        char c = client.read();
        Serial.write(c);
      }
    }
  } else {
    if(connected) {
      Serial.println("TCP disconnected");
      connected = false;
    }
  }
}
Connection:
Then the ESP is connected to the Astrocomms, Benduino or Marcduino like the XBEE.
5V
GND
RX to TX
TX to RX
The exception is the ESP8266-01. Here the power supply must be via 3V3 and this must also be connected to the Enabled pin (EN)
Additional Info:
In the R2 Touch app you need to make two changes in the settings:
Change the Receiver IP to 192.168.4.1 (maybe 192.168.1.10 or the IP defined within the sketch)
Change the Receiver Port to 9750 (or the Port defined within the sketch)
Adding an external antenna:
It’s possible to add an external antenna to an ESP. But be careful what you do.