D-O Control and Power Board

You are here:
Estimated reading time: 4 min

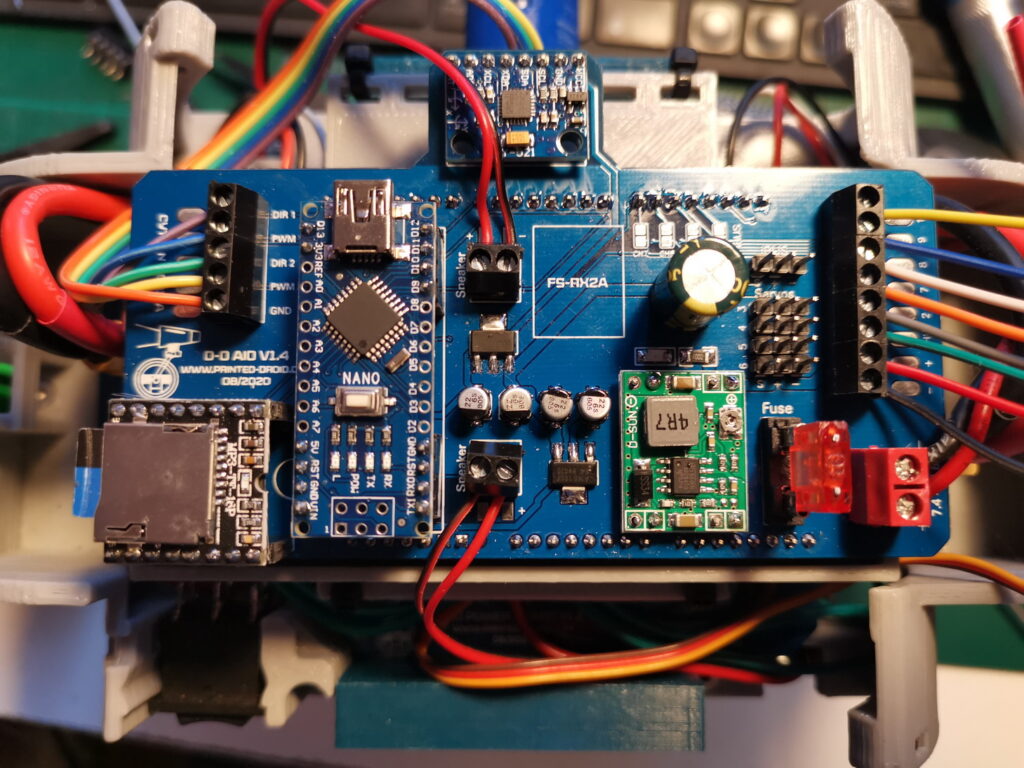
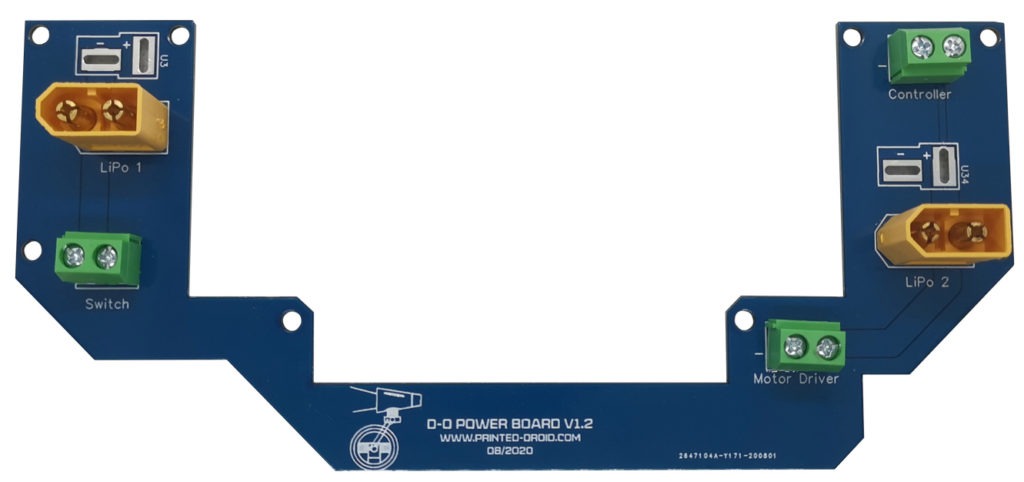
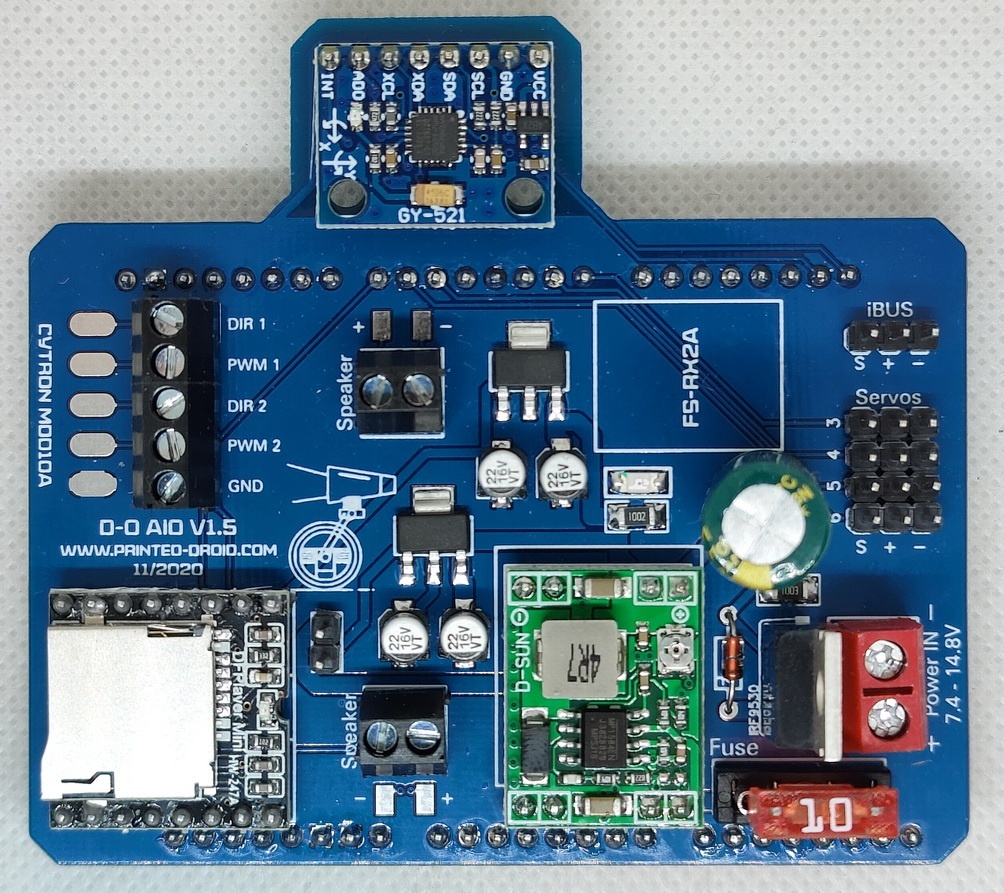
The D-O V2 control and power pcbs are made for Michael Baddeleys D-O V2.

They reduce the wiring to a minimum.
There are 2 Versions. The big one is designed for a bigger 10ch Receiver (that is connected via Ch. 2 & 7-10) and needs the Arduino Nano (unless you run the iBUS sketch).
The smaller board is iBUS only (perfect for the small 10ch iBUS receiver)

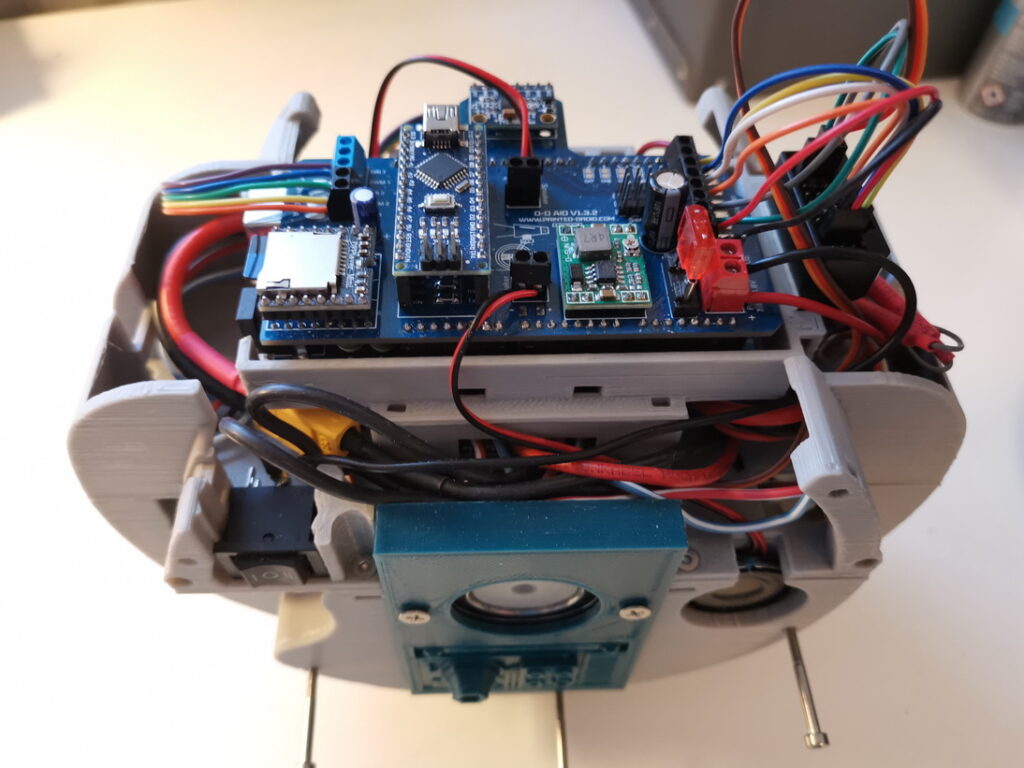
The D-O stand in the attachment is for testing everything without mounted “wheels”.

Available at shop.printed-droid.com
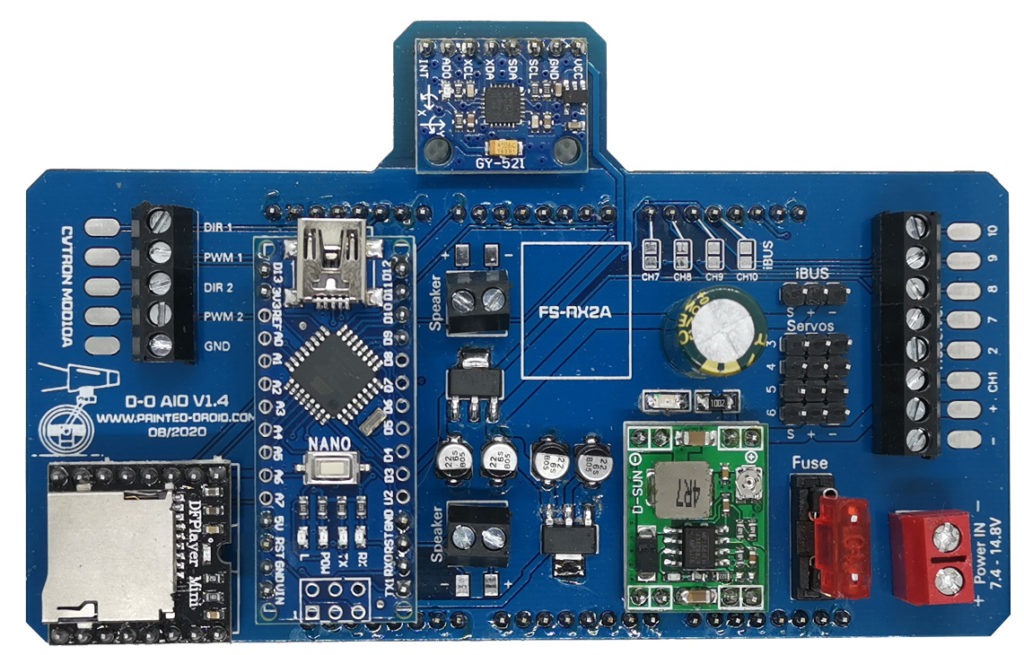
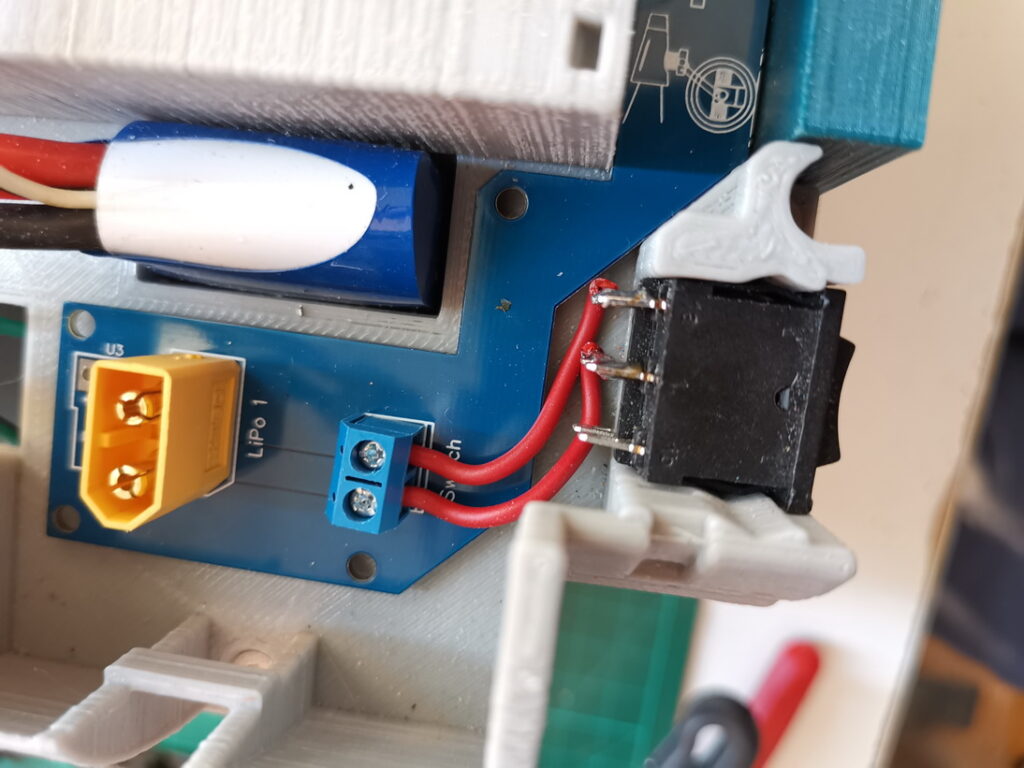
D-O Control PCB v1.4
D-O Power Board
D-O Mini iBUS Board
D-O Mini iBUS Board with FS-RX2A receiver

Receiver wiring:

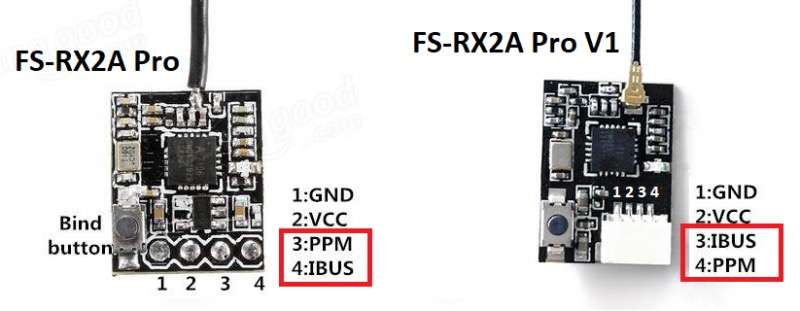
The FS-RX2A Pro receiver will also work well (all versions). Be carefull with the wiring:

How to bind:
• 1. Press and hold the Binding button, and supply power to the receiver, blue LED blinks fast means entering the binding mode.

• 2. Make the transmitter enter BIND mode.

• 3. The LED indicator become slowly blink means the binding is succeed.

• 4. Make the transmitter quit the BIND mode, the receiver LED indicator stay on means receiving signal.

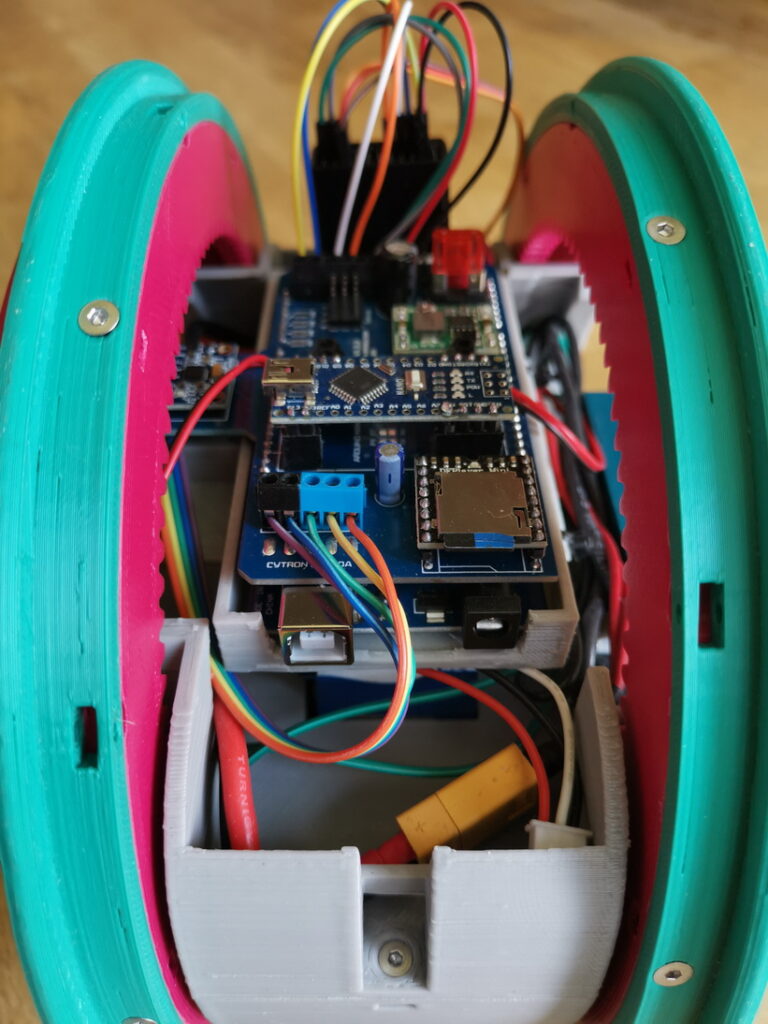
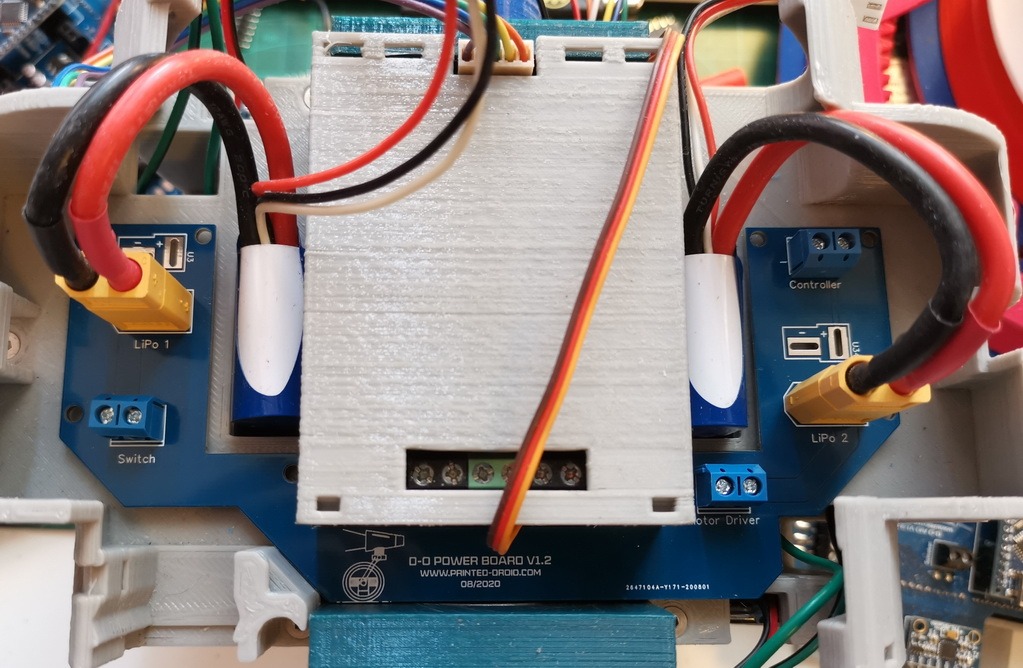
Some sample pictures of the installed boards:

D-O Droid Control System v2.0 – Setup and Upgrade Guide

The D-O Droid control system has been significantly upgraded to version 2.0, offering improved performance, reliability, and features. This guide covers both the Nano v2.0 (sound-only) and Mega iBus v2.0 (full system) implementations.

Key Point: When to Use Each System

  • Nano v2.0: ONLY needed for large D-O boards using the old PWM setup with Arduino Nano for sound
    (not using iBus)
  • Mega iBus v2.0: Recommended for all D-O boards – handles EVERYTHING in one controller

Part 1: Nano v2.0 Sound Controller

When You Need This

The Nano v2.0 sketch is ONLY required if you’re using a large D-O board with:

  • Traditional PWM RC receiver (not iBus)
  • Separate Mega for self-balancing
  • The original dual-controller setup

Note: If you’re using iBus, you DON’T need the Nano – the Mega handles everything!

What’s New in v2.0

1. Non-Blocking Operation (Major Improvement)

Old v1.0:

// Blocking - system freezes during reads
readsw1 = pulseIn(pin1, HIGH);
readsw2 = pulseIn(pin2, HIGH);
readsw3 = pulseIn(pin3, HIGH);
readsw4 = pulseIn(pin4, HIGH);

New v2.0:

// Non-blocking - reads one channel per loop
void readNextChannel() {
    int rawValue = pulseIn(pinToRead, HIGH, PWM_TIMEOUT);
    updateChannelState(channelIndex, rawValue);
}

Benefit: No more system freezes, smoother operation

2. Intelligent Noise Filtering

Old v1.0:

if (readsw1 < 1500) {
    soundstate = 1;  // Jittery switching
}

New v2.0:

// Hysteresis prevents false triggers
if (rawValue > PWM_THRESHOLD_MID + PWM_HYSTERESIS) {
    ch->currentPosition = 1;
} else if (rawValue < PWM_THRESHOLD_MID - PWM_HYSTERESIS) {
    ch->currentPosition = 0;
}

Benefit: Stable switching, no more sound spam from noisy signals

3. Professional Code Structure

  • Configurable parameters at the top
  • Conditional debug output
  • Proper state management
  • Clear function separation
  • Comprehensive documentation

4. Sound Queue Management

const unsigned long MIN_SOUND_INTERVAL = 400;  // Prevents overlap
void queueSound(uint8_t track) {
    if (currentTime - lastSoundTime >= MIN_SOUND_INTERVAL) {
        myDFPlayer.play(track);
    }
}

Benefit: No more sound overlap or audio glitches

Nano v2.0 Setup Instructions

Hardware Requirements

  • Arduino Nano
  • DFPlayer Mini
  • 1k ohm resistor
  • 4-channel PWM RC receiver
  • Speaker (8 ohm, <3W)
  • Micro SD card

Wiring

Nano → DFPlayer:
D0 (RX) → TX
D1 (TX) → 1k Resistor → RX
5V → VCC
GND → GND

Nano → RC Receiver:
D11 → Channel 1 (Mute)
D10 → Channel 2 (Greetings)
D12 → Channel 3 (Mood)
D9 → Channel 4 (Squeaky)

Configuration

Edit these values at the top of the sketch:

#define DEBUG_MODE 0              // Set to 1 for troubleshooting
const uint8_t DEFAULT_VOLUME = 25;  // 0-30
const unsigned long MIN_SOUND_INTERVAL = 400;  // Milliseconds

Part 2: Mega iBus v2.0 Full System

Why Choose iBus v2.0?

The new iBus v2.0 is a complete rewrite that combines ALL functions into one Mega:

  • Self-balancing
  • Sound control
  • Servo control
  • Battery monitoring
  • Configuration menu
  • Idle animations

You do NOT need a separate Nano when using this system!

Major Improvements Over v1.1

1. Runtime Configuration Menu (Game Changer!)

Old v1.1: Hard-coded values requiring recompilation

float kp = 25;  // Change requires reupload
float ki = 0;
float kd = 0.8;

New v2.0: Interactive serial menu

=== CONFIGURATION MENU ===
1. PID Configuration
2. Feature Toggles
3. Battery Settings
4. Sound Settings
5. Driving Dynamics

Benefit: Tune your D-O without recompiling!

2. Multiple Setup Modes

// Mode 0: PWM Only (balance only, external Nano)
// Mode 1: Hybrid (iBus + PWM sound)
// Mode 2: Pure iBus (recommended - all in one)

Benefit: Gradual migration path from old systems

3. Battery Monitoring with Protection

// Monitors 2S+2S LiPo configuration
if (battery_voltage < config.battery_critical) {
    emergency_stop_active = true;  // Protect your batteries!
}

Benefit: Never damage expensive LiPo batteries

4. Adaptive PID Control

// Automatically adjusts based on speed
if (avg_speed < 50) {
    current_kp = config.kp_slow;    // Stable when stationary
} else if (avg_speed > 150) {
    current_kp = config.kp_fast;    // Responsive when moving
}

Benefit: Better balance at all speeds

5. Advanced Driving Dynamics

  • Motor ramping for smooth acceleration
  • Exponential RC curves for precise control
  • Dynamic target angle (leans into movement)
  • Turn compensation
  • Acceleration limiting

6. Personality Features

// Idle animations after 3 seconds
void performRandomIdleAction() {
    // Random sounds or head movements
}

// State reactions
if (tilt > 15.0) {
    playSound(SOUND_TILT_WARNING);  // "Whoa!"
}

Benefit: D-O feels alive!

iBus v2.0 Setup Instructions

Hardware Requirements

  • Arduino Mega 2560 (required for Serial1)
  • iBus-compatible RC receiver (FS-iA6B or similar)
  • MPU6050 IMU
  • Cytron motor driver
  • DFPlayer Mini
  • 4 servo motors
  • Battery voltage divider (10k/3.3k resistors)

Complete Wiring

Mega → Motor Driver:
D13 → DIR1
D12 → PWM1
D11 → DIR2
D10 → PWM2

Mega → Servos:
D0 → Mainbar servo
D1 → Head servo 1
D5 → Head servo 2
D6 → Head servo 3

Mega → DFPlayer:
D7 → RX
D8 → TX (through 1k resistor)

Mega → iBus Receiver:
D19 (RX1) → iBus signal

Mega → MPU6050:
SDA → SDA (20)
SCL → SCL (21)

Mega → Battery Monitor:
A15 → Voltage divider center point

Initial Setup Process

1. First Upload

  1. Upload the iBus v2.0 sketch to Mega
  2. Open Serial Monitor (9600 baud)
  3. You’ll see: “Send ‘c’ for IMU calibration or ‘m’ for menu within 3 seconds…”

2. IMU Calibration (Important!)

  1. Place D-O in balanced upright position
  2. Send ‘c’ within 3 seconds
  3. Keep perfectly still during calibration
  4. Settings auto-save to EEPROM

3. Configuration Menu

Send ‘m’ at any time to enter the menu:

PID Configuration Example:

--- PID Configuration ---
KP [25.0] (0-100): 28
KI [0.0] (0-10): 0
KD [0.8] (0-10): 1.2
Target Angle [-0.3] (-10-10): -0.5

Feature Toggles Example:

--- Feature Toggles ---
Motor Ramping [ON] (1=ON, 0=OFF): 1
Adaptive PID [ON] (1=ON, 0=OFF): 1
Battery Monitor [ON] (1=ON, 0=OFF): 1

4. Selecting Setup Mode

If upgrading from an old system:

--- Setup Type Configuration ---
0 = PWM Only (Balance only, external Nano for sound)
1 = Hybrid (iBus drive + PWM sound)
2 = Pure iBus (Recommended)

Migration Scenarios

Scenario 1: New Build

  • Use Pure iBus mode (2)
  • Wire everything to Mega
  • No Nano needed!

Scenario 2: Upgrading from PWM + Nano

  • Start with Hybrid mode (1)
  • Keep existing Nano temporarily
  • Later switch to Pure iBus (2) and remove Nano

Scenario 3: Upgrading from iBus v1.1

  • Direct upgrade to v2.0
  • Run calibration
  • Configure via menu

SD Card Setup (Both Systems)

Create this folder structure:

/mp3/
  0001.mp3 - Startup ("battery charged")
  0002.mp3 - Default ("I am D-O")
  0003-0005.mp3 - Greetings
  0006-0009.mp3 - Negative sounds
  0010-0014.mp3 - Positive sounds
  0015-0020.mp3 - Squeaky wheel
  
  (iBus v2.0 only):
  0021.mp3 - Tilt warning
  0022.mp3 - Recovery sound
  0023.mp3 - Low battery warning
  0024-0030.mp3 - Idle sounds

Troubleshooting Guide

“No DFPlayer found”

  • Check wiring, especially the 1k resistor
  • Verify SD card is FAT32 formatted
  • Ensure files are named correctly (0001.mp3, etc.)

“Warning: PWM signals detected”

  • You have Mode 2 selected but PWM wires still connected
  • Either remove PWM connections or switch to Mode 1

Poor Balance Performance

  1. Run IMU calibration (‘c’ command)
  2. Adjust PID values:
    • Increase KP if too wobbly
    • Increase KD if oscillating
    • Usually KI = 0 works best

No RC Response

  • Check iBus connection to Pin 19
  • Verify transmitter/receiver binding
  • Check battery voltage

Best Practices

For Nano v2.0 (PWM Setup)

  1. Always set DEBUG_MODE to 0 for production
  2. Adjust PWM_HYSTERESIS if getting false triggers
  3. Keep MIN_SOUND_INTERVAL at 400ms or higher

for iBus v2.0 (Recommended)

  1. Always calibrate IMU on flat surface
  2. Start with default PID values
  3. Enable battery monitoring for LiPo protection
  4. Use Pure iBus mode (2) for all features

Summary

The v2.0 updates represent a major leap in functionality and reliability:

  • Nano v2.0: Professional rewrite for PWM-based sound control
  • iBus v2.0: Complete all-in-one solution with runtime configuration

For new builds, always choose the iBus v2.0 system – it’s more capable, easier to configure, and eliminates the need for dual controllers. The Nano v2.0 is only needed for maintaining older PWM-based setups.

Remember: With iBus, one Mega does everything!

Tags:
Was this article helpful?
Dislike 0 11 of 11 found this article helpful.
Views: 3778
Next: D-O BB1