If you are using an Arduino Pro Mini mounted on a DOME AIO, please remove the other Arduinos during flashing (remember their positions) and disconnect all power cables on the board.
The ISP headers are attached on the AIO next to the Pro Minis (Master/Client).
The Nanos have the ISP header directly on the Arduino.
Required Materials:
- Arduino Nano / Pro Mini
- An ISP Programmer (e.g., another Arduino board like Arduino Uno)
- 6 Male-to-Male jumper wires
- Computer with myAVR Progtool or Arduino IDE and
avrdudeinstalled - (USB cable for both Arduino boards)
Step 1a (better choice): Download and use myAVR Progtool.
https://shop.myavr.de/index.php?sp=download.sp.php&suchwort=dl112
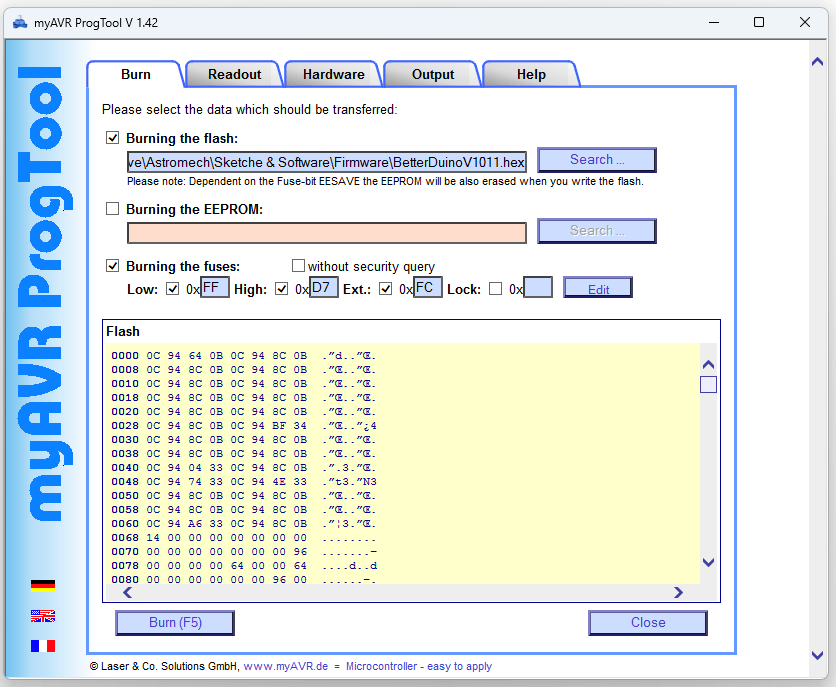
The tool myAVR ProgTool version 1.56 is simple and easy to use for programming.

- Select the firmware to be flashed (in this case, Betterduino v1.11)
- Also, check the box for “Burning the Fuses” (Low: FF, High: D7, Ext: FC)
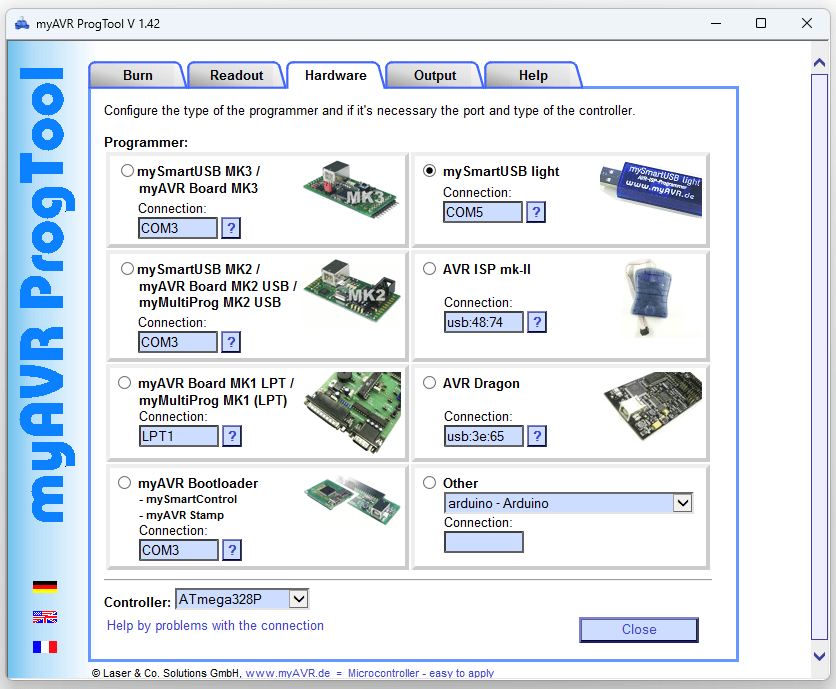
- Click “burn” after ensuring that everything is correctly set in the hardware settings
It is important to select ATmega328P (bottom left) and the programmer and port being used.

If everything here is correctly selected, click on “burn” on the first page.
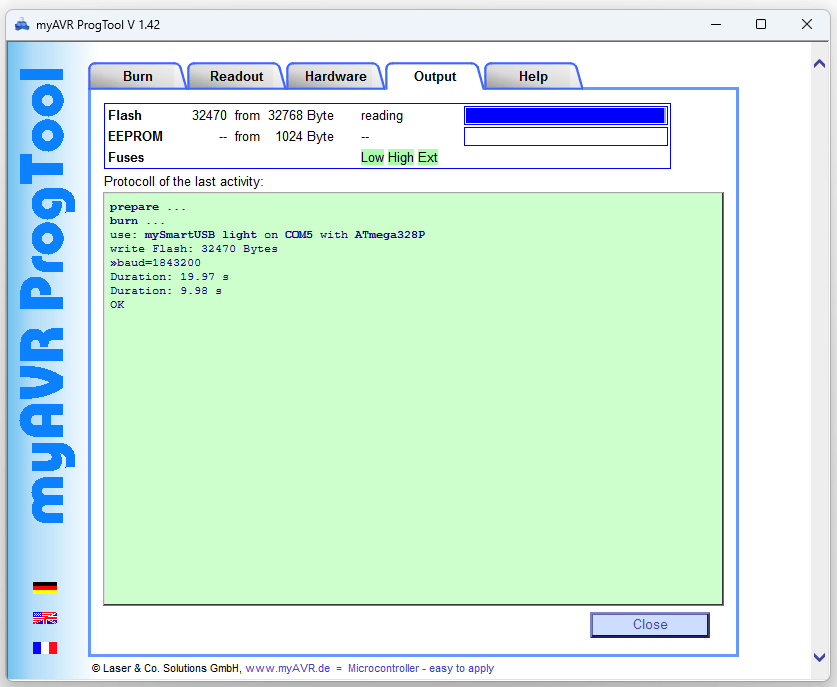
The program will then display the output screen where you can observe the process.
If an error message appears during the process, simply reflash after the “completion” of the burning process until it completes without errors.

Step 1b: Install and Configure Arduino IDE
- Download and Install the Arduino IDE: Get the latest version from the Arduino website.
- Upload ArduinoISP Sketch:
- Open the Arduino IDE.
- Go to
File > Examples > 11.ArduinoISP > ArduinoISP. - Select the correct board and port for your ISP programmer (e.g., Arduino Uno).
- Click on
Sketch > Uploadto upload the ArduinoISP sketch to your ISP programmer.
Step 2: Connect the Arduino Boards
An ISP programmer is highly recommended!
Connect the Arduino Nano to the ISP programmer (e.g., Arduino Uno) using jumper wires as follows:
| Arduino ISP (Uno) | Arduino Nano |
|---|---|
| D10 | RESET |
| D11 | D11 (MOSI) |
| D12 | D12 (MISO) |
| D13 | D13 (SCK) |
| 5V | 5V |
| GND | GND |
Step 3: Prepare HEX File and Set Fuse Settings
Make sure you have the HEX firmware file you want to upload and note the required fuse settings:
- Low fuse (L):
0xFF - High fuse (H):
0xD7 - Extended fuse (E):
0xFC
Step 4: Flashing the Firmware using avrdude
Open a terminal or command prompt.
Use the following avrdude command to flash the HEX file and set the fuse bits:
avrdude -C "[path to avrdude.conf]" -v -patmega328p -c arduino -P [COM port] -b 19200 -U flash:w:[path to firmware.hex]:i -U lfuse:w:0xFF:m -U hfuse:w:0xD7:m -U efuse:w:0xFC:m Replace the placeholders as follows:
[path to avrdude.conf]: Path to the avrdude.conf file (usually located in the Arduino IDE installation directory).
[COM port]: The COM port of your ISP programmer (e.g., COM3 on Windows or /dev/ttyACM0 on Linux).
[path to firmware.hex]: Path to your HEX firmware file.
Step 5: Verify the Process
- Run the command: Press Enter to execute the
avrdudecommand. The terminal will show the progress and confirm when the flashing is complete. - Verify Fuse Settings: Ensure the fuse settings are correctly applied to avoid any malfunction or EEPROM content reset.
Congratulations! Your Arduino Nano should now be flashed with the new HEX firmware via ISP.
Further links and tutorials:
- avrdude: https://github.com/MCUdude/avrdude
- GUI for avrdude: https://blog.zakkemble.net/avrdudess-a-gui-for-avrdude/
- some instructions: https://forum.arduino.cc/t/the-simplest-way-to-upload-a-compiled-hex-file-without-the-ide/401996
